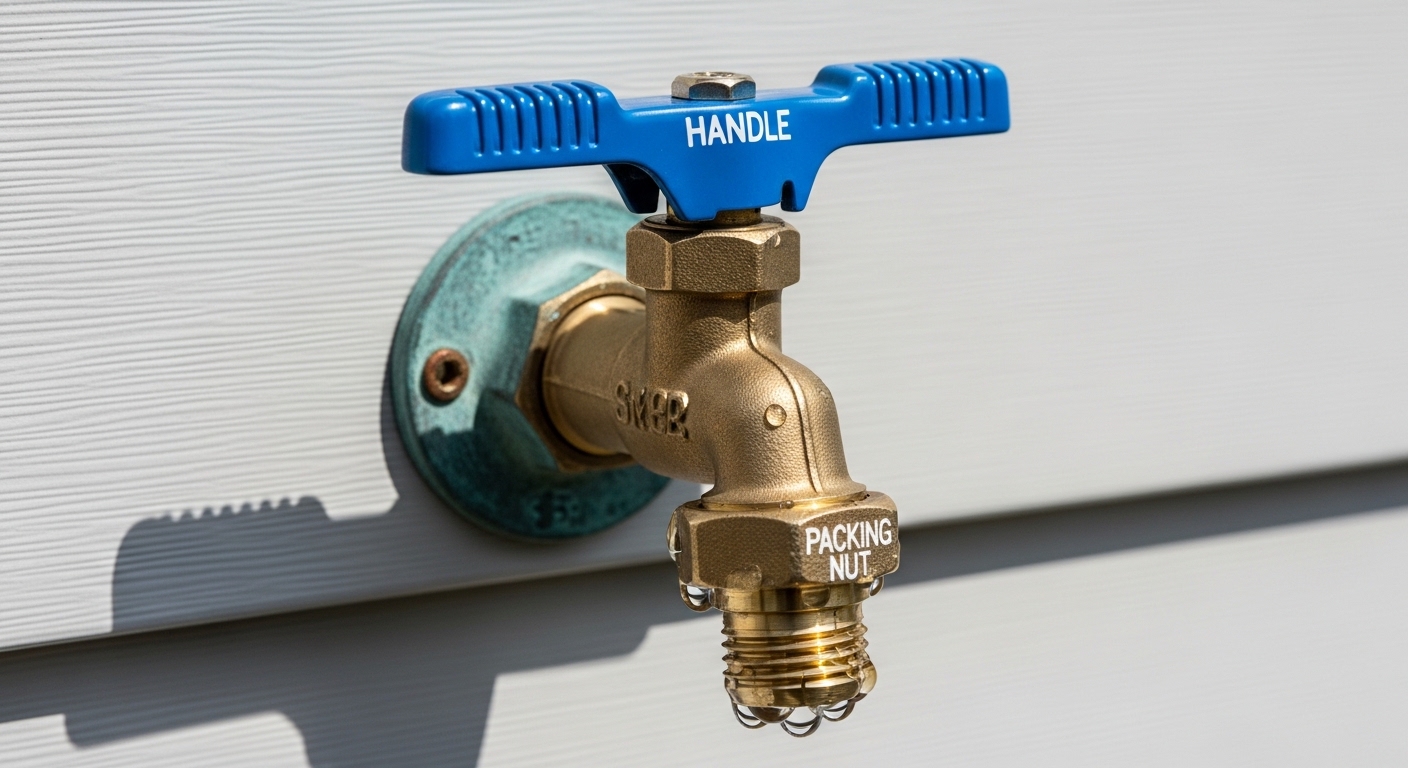
An outdoor faucet cartridge replacement is the single most common fix for an outdoor spigot that drips, won’t fully shut off, or leaks from the handle — and it’s a job most homeowners can finish in under an hour with a wrench, a screwdriver, and the correct part. The cartridge (sometimes called the stem, valve, or bonnet assembly, depending on the faucet type) is the internal moving piece that opens and closes the water flow. When its rubber seals or ceramic discs wear out, water sneaks past them, and you get the classic drip that soaks the wall or freezes into an ice column in winter.
This guide walks you through exactly how to identify your faucet type, remove the old part without snapping anything, choose the right replacement, and put it all back together so it seals like new. We’ll also cover the frost-free (also called “freeze-proof”) spigots that trip people up, because their cartridge lives 6–12 inches back inside the wall — not right behind the handle.
What Exactly Is an Outdoor Faucet Cartridge, and Why Does It Fail?
An outdoor faucet cartridge is the replaceable internal valve that controls water flow when you turn the handle — and it fails because its rubber washer, O-rings, or ceramic discs wear down from mineral scale, freezing, and repeated use. On outdoor spigots, “cartridge” is a loose term. Older and budget hose bibs use a compression stem with a flat rubber washer on the end. Frost-free sillcocks use a long stem that reaches a seat deep inside the wall. Some newer or premium models use a true ceramic-disc cartridge like an indoor faucet.
Here’s what actually goes wrong inside them:
- Worn washer or seat: The rubber washer at the tip flattens or hardens, so it can’t press tight against the brass seat. Result: a steady drip from the spout even when closed.
- Failed packing / O-rings: The seals around the stem shaft dry out, so water weeps out around the handle when the faucet is running.
- Cracked ceramic disc: On disc-style cartridges, a freeze or grit can chip the ceramic, giving you a drip that no amount of tightening fixes.
- Mineral scale (hard water): Calcium buildup scratches seals and jams the stem so the handle gets stiff.
If your leak is coming from the handle only when the water is on, you likely need new packing or O-rings. If it drips from the spout with the handle fully closed, you need a new washer, stem, or cartridge. Both are covered by the same replacement job below.
How Do I Know Which Cartridge or Stem My Outdoor Faucet Needs?
Identify the part by pulling the old one and matching it exactly — brand, length, and thread pattern must all line up, because outdoor faucet stems are not universal. The safest method is “remove first, buy second”: take the old cartridge with you to the hardware store or photograph it next to a ruler for an online order. Guessing by faucet brand alone is the number-one reason a repair drips right after reassembly.
Three quick things to check before you buy:
- Faucet type. Is it a standard wall spigot (short body) or a frost-free sillcock (long body, handle sits proud of the wall on a sloped stem)? Frost-free stems can be 4″, 6″, 8″, 10″, 12″, or 14″ long — measure yours.
- Brand markings. Look for a name cast into the handle or body — Woodford, Mansfield, Prier, Arrowhead, B&K, or a builder brand. Match the replacement stem to that maker’s part number.
- Connection style. Note whether the washer is held by a brass screw, whether there’s a separate seat you can also replace, and the packing nut thread size.
Because outdoor stems share a lot of DNA with indoor valve stems, the same diagnostic logic in our guide on how to replace a bathroom faucet stem that keeps dripping applies here almost one-to-one — the difference is mostly stem length and the outdoor exposure. And if your spigot is the older hose-bib style feeding a garden hose, our breakdown of the garden hose faucet stem shows the exact stem-and-washer anatomy you’ll be pulling out.
What Tools and Parts Do I Need for an Outdoor Faucet Cartridge Replacement?
You need an adjustable wrench, a screwdriver, the correct replacement cartridge or stem, and a few cents’ worth of washers and plumber’s grease — a total parts cost of roughly $8–$25 for most homes. You don’t need a torch, solder, or any pipe cutting for a straight cartridge swap. Here’s the full checklist:
- Adjustable wrench or a set of open-end wrenches (for the packing nut / bonnet)
- Phillips and flat-head screwdrivers
- Replacement stem or cartridge that matches your faucet exactly
- New rubber washer and packing (often included in a repair kit)
- Silicone plumber’s grease (never petroleum jelly — it degrades rubber)
- Penetrating oil, in case the packing nut is corroded
- A rag and small bucket to catch residual water
- Optional: a seat wrench, if the brass seat is pitted and also needs replacing
Step-by-Step: How Do You Actually Replace the Cartridge?
Shut off the water, drain the line, unscrew the packing nut, pull the old stem, install the new one, and reopen the water — in that order. Here’s the detailed sequence that works for both standard and frost-free spigots:
- Shut off the supply. Find the shutoff valve on the pipe feeding the outdoor faucet — usually in the basement, crawlspace, or utility room where the line exits the house. If there’s no dedicated valve, shut off the main. Frost-free faucets do not have a separate outdoor shutoff; they rely on the interior valve or main.
- Open the faucet to relieve pressure. Turn the handle wide open and let all remaining water drain out. This also confirms the shutoff worked.
- Remove the handle. Unscrew the handle screw and pull the handle off. On some models the packing nut is accessible with the handle still on — but removing it gives you clearance.
- Loosen the packing nut / bonnet. With your wrench, turn it counterclockwise. If it’s stuck, apply penetrating oil, wait ten minutes, and brace the faucet body so you don’t twist the pipe inside the wall — that’s how people crack a soldered joint.
- Pull the stem or cartridge out. On a frost-free unit, thread the handle back on and turn it as if opening the faucet; the whole long stem backs out. On a compression stem, it lifts straight out once the nut is off. On a disc cartridge, it may have a retaining clip to pop first.
- Inspect and match. Compare the old part to your new one — length, threads, washer size. Check the seat inside the body; if it’s rough or pitted, replace or reface it now.
- Grease and install the new cartridge. Wipe a thin film of silicone grease on the O-rings and threads, then slide or thread the new stem in. Hand-start it to avoid cross-threading, then snug the packing nut — firm, not gorilla-tight.
- Reattach the handle and restore water. Slowly reopen the interior shutoff, check for leaks at the handle and spout, and cycle the faucet a few times.
One warning specific to outdoor work: if the packing nut or faucet body is heavily corroded, stop and read up before you force it. Snapping an old galvanized nipple inside the wall turns a $15 fix into a wall-opening repair. Our guide on corroded faucet removal without snapping the pipe covers the penetrating-oil, heat, and bracing tricks that save the day.
Frost-Free vs. Standard Spigot vs. Ceramic Cartridge — Which Repair Do I Have?
The repair differs by faucet type: standard compression spigots need a washer or stem, frost-free sillcocks need a long stem swap, and ceramic-disc outdoor faucets take a drop-in cartridge. Use the table below to pin down your situation and rough effort.
| Faucet Type | What Fails | Part Needed | Typical Cost | Difficulty |
|---|---|---|---|---|
| Standard compression hose bib | Rubber washer, packing | Washer + packing kit or full stem | $3–$12 | Easy (20 min) |
| Frost-free / freeze-proof sillcock | Long stem washer, O-rings | Brand-matched long stem (4″–14″) | $12–$25 | Easy–Moderate (30–40 min) |
| Ceramic-disc outdoor faucet | Cracked or scaled disc cartridge | Drop-in ceramic cartridge | $10–$25 | Easy (25 min) |
| Anti-siphon / vacuum-breaker model | Vacuum breaker or stem seal | Stem + vacuum breaker repair kit | $8–$20 | Moderate (40 min) |
If your spigot is plumbed to a copper line and you discover the connection itself is weeping — not just the cartridge — you may be looking at the stub-out behind the faucet rather than the valve. Our explainer on the copper faucet stub out shows how that transition is built so you can tell a cartridge leak from a joint leak before you start.
How Much Does It Cost to Replace an Outdoor Faucet Cartridge — DIY vs. Plumber?
DIY costs $8–$25 in parts; a plumber typically charges $100–$250 for the same job because of the minimum service call and labor. Since the cartridge or stem is the expensive-feeling part but actually cheap, the math strongly favors doing it yourself — provided the faucet isn’t so corroded that it needs full replacement.
When does it make sense to pay a pro or replace the whole faucet instead?
- The faucet body is cracked from a hard freeze (a new stem won’t seal a split casting).
- The pipe behind the wall is galvanized and crumbling.
- You’ve replaced the cartridge and it still leaks — the brass seat is likely damaged beyond refacing.
- The faucet is 25+ years old and parts are discontinued; a modern frost-free replacement is a better value.
In most cases, though, a $12 stem and 30 minutes solves it. A drip that wastes even a slow trickle can add up to hundreds of gallons a month — so this is one of the highest-ROI home repairs you can do.
Author Note, Testing & Warranty
About the author: This guide was written by the adeaga fixtures team — product specialists who install, bench-test, and pressure-cycle faucet cartridges and stems as part of our sourcing work. We’ve disassembled hundreds of hose bibs, frost-free sillcocks, and disc cartridges across brands, so the failure patterns described here come from hands-on teardown, not spec sheets.
Brand credibility: adeaga (adeaga.net) curates and reviews faucets, shower systems, and repair parts for real-world durability. We prioritize fixtures whose valves meet recognized plumbing standards — look for cartridges and stems tested to ASME A112.18.1 / NSF 61 for potable-water contact and low-lead compliance. Quality frost-free sillcocks from established makers typically carry a limited lifetime warranty on the body and a multi-year warranty on the cartridge; keep your receipt and the old part’s model number so a warranty claim is painless. Always confirm your replacement stem is rated for the same pressure and temperature range as your original.
FAQ
Can I replace an outdoor faucet cartridge without turning off the main water?
Only if the outdoor line has its own dedicated shutoff valve — then you close just that valve. Frost-free spigots almost never have a separate outdoor shutoff, so you’ll usually need to close the interior branch valve or the main. Never attempt to pull a stem under live pressure; you’ll get soaked and can lose control of the part.
Why does my outdoor faucet still drip after I replaced the cartridge?
The most common reason is a damaged brass seat that the new washer can’t seal against, or a stem that isn’t an exact match for your faucet. Inspect the seat inside the body with a flashlight — if it’s pitted or grooved, reface it with a seat-dressing tool or replace the seat. A packing nut that’s slightly loose can also cause a handle drip; snug it a quarter-turn.
How long does an outdoor faucet cartridge replacement take?
About 20–40 minutes for someone doing it the first time, assuming the packing nut isn’t seized. Standard compression spigots are quickest; frost-free sillcocks take a little longer because the stem is long and you thread it out with the handle. Corroded hardware is the only thing that reliably blows up the timeline.
Are outdoor faucet cartridges universal, or brand-specific?
They are brand- and model-specific — not universal. Woodford, Prier, Mansfield, and Arrowhead stems all differ in length, thread pitch, and washer size. Always match the replacement to your faucet’s maker and stem length, ideally by bringing the old part to the store or ordering the exact part number.
Should I just replace the whole outdoor faucet instead of the cartridge?
Replace the whole faucet only if the body is cracked, the pipe behind it is failing, or replacement stems are discontinued. If the casting is sound and parts are available, a cartridge or stem swap is far cheaper and less invasive than cutting into the wall to swap the entire sillcock.
What’s the difference between an outdoor faucet cartridge and a stem?
A “stem” is the older compression-style valve with a rubber washer screwed to the end; a “cartridge” usually refers to a self-contained ceramic-disc unit. Outdoor faucets use both, and people use the terms interchangeably. The replacement process is the same: isolate the water, remove the old unit, and install an identical new one.