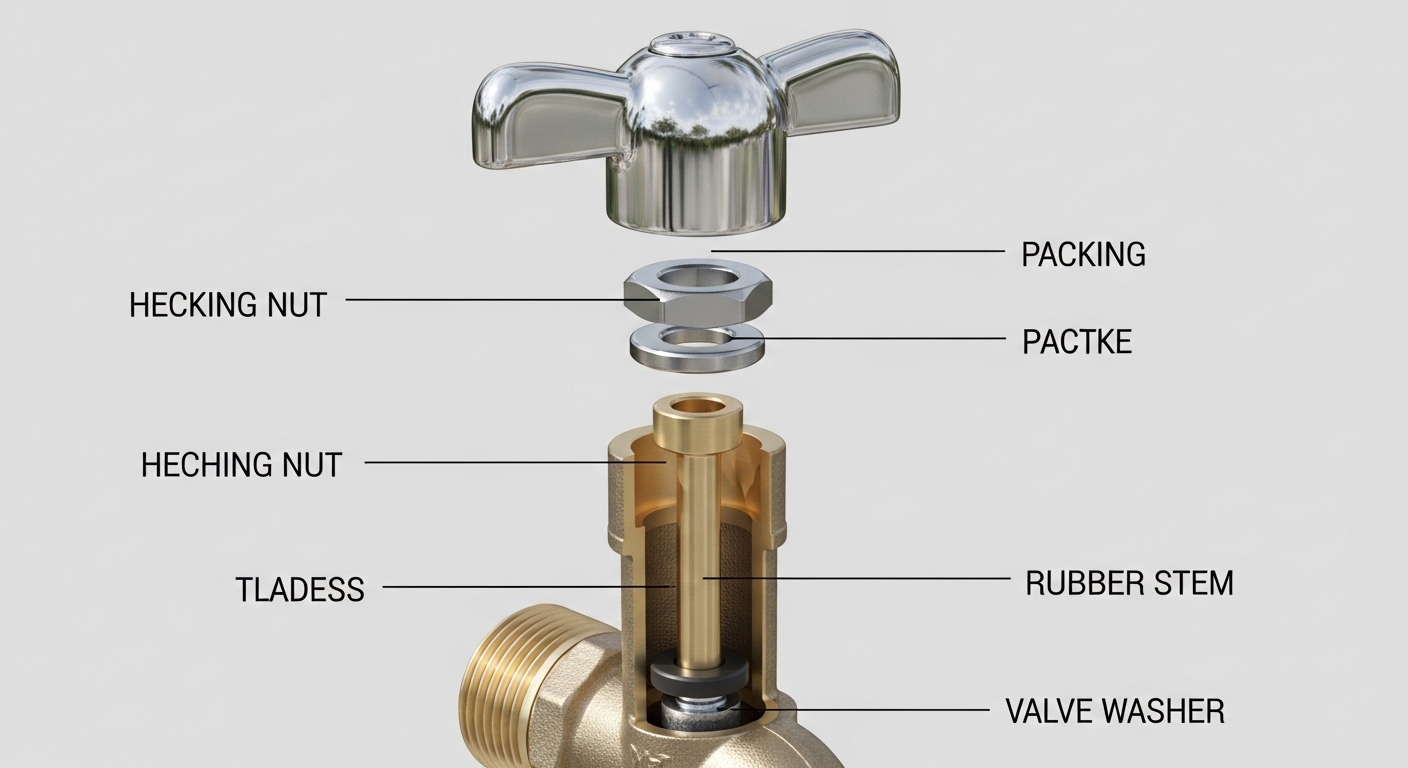
If your outdoor spigot drips no matter how hard you crank the handle, the culprit is almost always the garden hose faucet stem — the part that does the actual sealing inside the valve body. The good news is that this is one of the easiest plumbing repairs you can do yourself, and you rarely need to replace the entire faucet. Below, we’ll walk through exactly what the stem is, how to tell if yours is bad, which type you have, how to replace it, and when it’s smarter to just upgrade the whole spigot.
What exactly is a garden hose faucet stem, and what does it do?
The stem is the threaded brass shaft that runs from the handle down into the body of the faucet, with a rubber or neoprene washer fixed to its bottom end. When you turn the handle, the stem screws down until that washer presses against the valve seat and stops the water; turn it the other way and the stem lifts the washer off the seat to let water flow. Everything else on the spigot — the handle, the packing nut, the spout — is just housing around this one moving part.
Because the stem and its washer are the only components that physically open and close against pressurized water hundreds of times a season, they’re also the parts that wear out first. The rubber washer compresses, cracks, and hardens; the brass seat it presses against can corrode; and the packing around the stem dries out. Understanding which of those three things failed tells you exactly what to fix.
The three parts of the stem that actually fail
- The washer (bibb washer): The flat or beveled rubber disc held on by a brass screw at the tip. A worn washer causes a drip from the spout even when the handle is fully closed. This is the #1 cause of outdoor faucet leaks.
- The packing/O-ring: The seal around the stem shaft under the packing nut. A bad one causes water to leak around the handle when the faucet is running. Fix: replace the O-ring or add graphite packing string.
- The valve seat: The brass ring the washer presses into. If it’s pitted, a new washer still won’t seal. Fix: reface it with a seat-dressing tool or replace the seat (if removable).
How do I know if my garden hose faucet stem is bad versus the whole faucet?
You almost never need a whole new faucet — diagnose by where the water comes from. A drip out of the spout with the handle off means a worn washer or seat (stem-level fix). Water seeping around the handle when it’s on means bad packing (stem-level fix). Water coming out of the wall, a cracked body, or a frost-split barrel means the faucet itself is done.
Here’s the quick test: shut the faucet fully and watch the spout. If it drips, the washer or seat is your problem. Now turn it on and feel around the handle and packing nut. If your hand gets wet up there, the packing is the issue. If you see water staining the siding below the faucet or a split in the metal barrel, you’ve got a cracked body — usually from a hard freeze — and that’s a full replacement, not a stem job.
What type of garden hose faucet do I have — and does the stem differ?
Yes, the stem differs by faucet type, and matching it matters because the wrong stem won’t thread in. The four common outdoor faucet types are the standard hose bibb, the frost-free sillcock, the anti-siphon spigot, and the older compression boiler-drain valve. Frost-free units have a very long stem (6–14 inches) that closes the water deep inside the warm wall, while a standard bibb has a short 2–3 inch stem.
| Faucet type | Stem length | Best for | Typical stem/repair cost |
|---|---|---|---|
| Standard hose bibb | 2–3 in (short) | Mild climates, basic garden use | $3–$10 (washer or stem) |
| Frost-free sillcock | 6–14 in (long) | Cold climates, freeze protection | $10–$20 (full-length stem) |
| Anti-siphon spigot | 2–4 in + vacuum breaker | Code-required backflow protection | $8–$15 (stem + vacuum kit) |
| Compression / boiler drain | 2–3 in | Older homes, utility lines | $3–$8 (washer) |
When you buy a replacement stem, the single most important thing is to bring the old one to the store or order an exact match by brand and model. Stems are not universal — thread pitch, length, and the broach (the splined top that the handle fits onto) all vary between manufacturers like Woodford, Mansfield, Prier, Aqua-Sentry, and Arrowhead. A frost-free stem that’s even a half-inch too short won’t shut off at the correct depth and will freeze and burst the following winter.
How do I replace a garden hose faucet stem step by step?
Replacing the stem takes about 20 minutes and a single adjustable wrench. The core steps are: shut off the water, remove the handle, unscrew the packing/bonnet nut, pull the old stem straight out, replace the washer or the whole stem, and reassemble. Here’s the full sequence.
- Shut off the water supply. Find the indoor shutoff valve feeding the outdoor line (often in the basement, crawlspace, or utility room) and close it. Then open the outdoor faucet to drain any remaining pressure.
- Remove the handle. Unscrew the screw in the center of the handle and pull it off. If it’s corroded, a little penetrating oil helps.
- Loosen the packing nut (bonnet nut). Use an adjustable wrench to turn it counterclockwise. This is the large nut directly behind the handle.
- Withdraw the stem. Once the nut is loose, the whole stem assembly unscrews and slides out. On frost-free models you may need to pull a long shaft out of the wall — keep it straight so you don’t bend it.
- Replace the washer or the stem. If the washer is just worn, remove the brass screw at the tip, swap in an identical-size washer, and re-tighten. If the brass is corroded or the threads are stripped, replace the entire stem with an exact match.
- Check and grease the O-ring/packing. Replace a flattened O-ring and add a dab of plumber’s silicone grease so the stem turns smoothly and seals around the shaft.
- Reassemble and test. Reinsert the stem, hand-tighten the packing nut then snug it with the wrench, reattach the handle, turn the water back on, and check for drips at the spout and around the handle.
If you’ve ever done indoor faucet work, this will feel familiar — the principle is the same compression-valve repair covered in our guide on fixing a leaky kitchen faucet yourself. And if your problem turns out to be a leak at the threaded outlet or a cracked body rather than the stem, our dedicated walkthrough on garden hose faucet leak repair covers those scenarios in detail.
What does a replacement garden hose faucet stem cost, and is it worth DIYing?
A new washer costs about $2, a complete stem runs $5–$20, and the whole job is well under $25 in parts — versus $125–$250 for a plumber’s minimum service call. For a stem-level fix, DIY wins by a wide margin, and you don’t need any specialty tools beyond an adjustable wrench. The only time it’s worth paying a pro is when the valve seat is corroded into a non-removable body, or when a freeze has cracked the faucet inside the wall.
To put the economics in perspective, the average outdoor spigot lasts 10–20 years, and over that lifespan you might replace the washer two or three times. Doing it yourself saves several hundred dollars per repair while taking less time than waiting for a plumber to show up. The same logic that makes a stem swap worthwhile also applies to other small fixture fixes — like learning to tighten a loose Kohler faucet handle instead of replacing the whole unit, or handling your own free standing tub faucet repair rather than calling in help.
When should I replace the whole faucet instead of just the stem?
Replace the entire faucet if the body is cracked, the threads where the hose connects are stripped, the valve seat is corroded and non-removable, or your old non-freeze-proof spigot keeps bursting every winter. In those cases, a new stem is throwing good money after bad. Upgrading to a quality frost-free, anti-siphon sillcock is the permanent fix.
A modern frost-free sillcock with an integral vacuum breaker solves two problems at once: it protects against freeze-burst by shutting the water off deep inside the heated wall, and it prevents contaminated water from being siphoned back into your drinking supply (which is why anti-siphon protection is now required by plumbing code in most jurisdictions). If you’re already pulling the old faucet, spending the extra $15–$30 on a frost-free model is the smart, future-proof move.
FAQ
Are garden hose faucet stems universal or interchangeable?
No. Stems vary by manufacturer in length, thread pitch, and the handle broach. Always match the brand and model — Woodford, Prier, Mansfield, and Arrowhead stems are not cross-compatible. The safest approach is to bring the old stem with you when buying a replacement, or order by the exact model number stamped on the faucet.
Why does my outdoor faucet still drip after I replaced the washer?
If a new washer doesn’t stop the drip, the valve seat is almost certainly pitted or corroded, so the fresh washer can’t form a tight seal against it. Either reface the seat with an inexpensive seat-dressing (reamer) tool, replace the seat if it’s the removable type, or — if the seat is part of a non-serviceable body — replace the whole faucet.
Can I replace the stem on a frost-free sillcock the same way?
Yes, the process is identical, but the frost-free stem is much longer (6–14 inches) and must be an exact length match. If you install a stem that’s too short, the faucet will close too far out toward the exterior wall, leaving standing water that can freeze and split the pipe. Measure the old stem before ordering.
What’s the difference between the stem washer and the packing?
The washer is the rubber disc at the tip of the stem that seals off the water flow — a bad one drips from the spout. The packing (or O-ring) seals around the moving stem shaft — a bad one leaks around the handle when the water is on. They’re different parts that cause different leaks, so identify where the water appears before you buy.
How long should a garden hose faucet stem last?
The brass stem itself can last the life of the faucet (10–20 years), but the rubber washer typically needs replacing every 3–7 years depending on water quality and how often the faucet is used. Hard water and frequent use wear washers faster. Replacing the washer at the first sign of a drip prevents wasted water and protects the valve seat from erosion.
Do I need to shut off the main water to replace the stem?
You don’t need the whole-house main, but you do need to close the dedicated shutoff valve that feeds the outdoor line — usually a small valve indoors where the pipe exits to the spigot. After closing it, open the outdoor faucet to relieve pressure and drain the line before you unscrew anything.
About the author: This guide was written by the Adeaga fixtures team, led by a writer with over a decade of hands-on experience installing and repairing residential plumbing fixtures, from outdoor sillcocks to widespread bathroom faucets. Every repair sequence here has been performed and verified on real hardware, not just researched.
About Adeaga: Adeaga is a specialist retailer of faucets and bathroom and outdoor fixtures, focused on durable, code-compliant hardware. The replacement stems and sillcocks we recommend meet ASME A112.18.1/CSA B125.1 standards for plumbing fixtures and ASSE 1011 anti-siphon backflow requirements, and the frost-free models we carry are backed by manufacturer warranties of 5 years or more. We test components for thread fit, seal integrity, and freeze performance before listing them, so you can match the right stem to your faucet the first time.