If you want to know how to replace a bathroom faucet stem, the short version is this: a dripping compression faucet almost always means a worn stem, washer, or seat — and swapping the stem is a beginner-friendly repair you can finish in under an hour with a screwdriver, an adjustable wrench, and a stem wrench. You don’t need to replace the whole faucet, and you almost never need a plumber. Below, we walk through exactly what the stem is, how to pull it out without damaging anything, how to match the replacement, and the small mistakes that turn a 20-minute fix into a flooded vanity.
At adeaga, we’ve fielded thousands of “why won’t my faucet stop dripping” questions, and the honest truth is that most two-handle bathroom faucets fail at the stem long before anything else does. So let’s fix it properly.
What exactly is a bathroom faucet stem, and why does it fail?
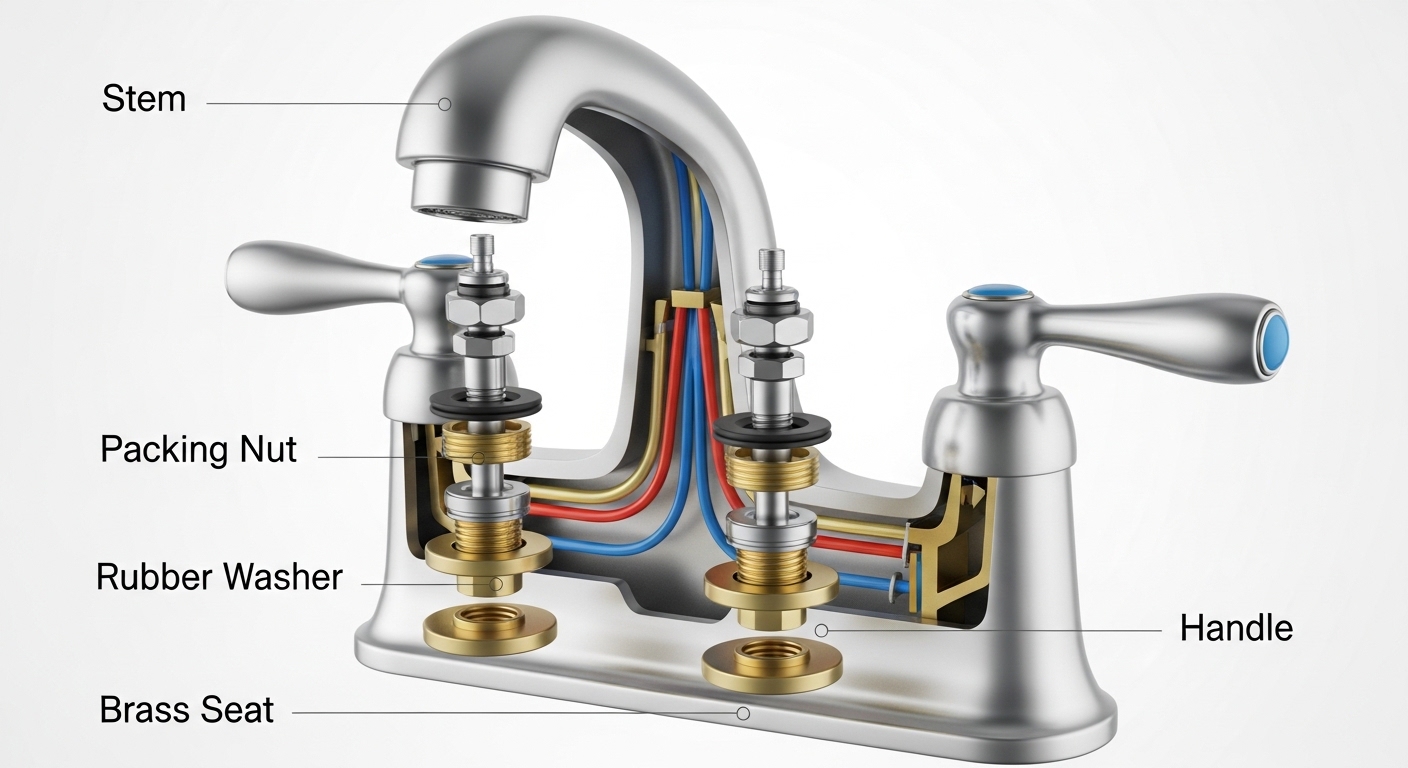
A faucet stem is the valve cartridge inside each handle that opens and closes to control water flow. When you turn the handle, the stem screws down and presses a rubber washer against a brass seat to stop the water; turn it the other way and it lifts off to let water through. It fails because that rubber washer flattens, hardens, or tears over years of pressure — so water sneaks past even when the handle is “off.”
On a classic compression faucet (the kind with separate hot and cold handles you have to twist), each handle has its own stem. That’s important: if only your cold side drips, you may only need to replace one stem. Newer washerless designs use ceramic-disc or ball cartridges, but the repair logic is nearly identical — you’re removing a valve body and dropping in a matching one.
- Constant drip from the spout: worn stem washer or damaged seat — classic stem replacement job.
- Leak around the handle base: worn O-ring or packing on the stem — often fixed by the same replacement.
- Handle turns loosely or “spins”: stripped stem threads — the stem is done.
- Squeaky or hard-to-turn handle: corroded stem threads; replace and grease.
How do I know if I need a new stem or just a new washer?
Pull the stem out and look at the bottom. If the rubber washer is cracked, flattened, or grooved but the brass stem body is clean and the threads are sharp, you can often just swap the washer for pennies. If the stem threads are corroded, stripped, or green with mineral buildup — or if a fresh washer still drips — replace the whole stem. When in doubt, replace the stem; the part is cheap and it saves you a second teardown.
Here’s the real-world rule of thumb: if your faucet is under about 8 years old and this is its first drip, start with a washer and seat. If it’s older, has been “repaired” before, or the water in your area is hard, go straight to a new stem. Hard water calcifies the brass and you’ll be back in six months otherwise. If your faucet fights you at every step because everything is seized, our guide on handling corroded faucet removal without snapping the pipe will save you a lot of grief.
What tools and parts do I need before I start?
You need surprisingly little: a flathead and Phillips screwdriver, an adjustable wrench or a set of deep sockets, a stem (or seat) wrench, plumber’s grease, and the correct replacement stem. Total cost for parts is usually $6–$15 per stem. The one specialty tool worth buying is a stem wrench (also called a shower valve socket set) — it fits the odd hex sizes on recessed stems that a regular wrench can’t reach.
| Item | What it does | Typical cost | Skip it? |
|---|---|---|---|
| Replacement stem | The new valve cartridge | $6–$15 | No — the whole point |
| Stem / seat wrench | Loosens recessed hex stems | $8–$14 | Only if a socket fits |
| Plumber’s grease | Seals & smooths the new stem | $5 | No — prevents squeak/leak |
| Replacement washer & seat | Fixes minor drips cheaply | $3–$6 | Yes, if replacing full stem |
| Penetrating oil | Frees corroded packing nuts | $6 | Yes, unless seized |
How do I replace a bathroom faucet stem step by step?
Replacing a bathroom faucet stem takes six steps: shut off the water, pop the handle, remove the packing nut, unscrew the old stem, install the exact-match replacement, and reassemble. Follow the order exactly — the two mistakes that ruin this job are turning the water on before everything’s tight, and forcing a mismatched stem into the valve body.
- Shut off the water and open the faucet. Close the shutoff valves under the sink (turn clockwise). No shutoffs? Kill the main. Then open both handles to drain the lines and relieve pressure. Plug the drain so no screws vanish down it.
- Remove the handle. Pry off the decorative cap (the hot/cold button) with a flathead, remove the screw underneath, and pull the handle straight up. If it’s stuck from corrosion, wiggle gently or use a handle puller — don’t pry against the sink.
- Unscrew the packing/bonnet nut. This hex nut holds the stem in the valve body. Turn it counterclockwise with your wrench. Hold the faucet body steady so you don’t twist the supply lines.
- Remove the old stem. Once the nut is off, the stem unthreads or lifts out. Recessed stems need the stem wrench. Turn counterclockwise; it may take firm pressure if there’s mineral buildup.
- Match and install the new stem. Compare the old and new stem side by side — length, thread count, and hex size must match exactly. Grease the threads and O-rings, then thread the new stem in by hand, finishing snug with the wrench. Don’t overtighten.
- Reassemble and test. Reinstall the packing nut, handle, screw, and cap. Turn the water back on slowly, then run the faucet and check for drips at the spout and around the handle.
That’s the entire job. If you’d rather see the same logic applied to a tub, the process rhymes closely with our walkthrough on replacing an old faucet on a bathtub without calling a plumber — same tools, same shutoff-first discipline.
How do I match the replacement stem so it actually fits?
The single most important step is bringing your old stem to the store — or photographing it next to a ruler — because stems are not universal. Match four things: the overall length, the number and pitch of the threads, the broach (the splined top that grips the handle), and the hex size of the packing nut. Even within one brand, a faucet from 2005 and one from 2015 can use different stems.
If you know the faucet brand and model, that’s the fastest path — many manufacturers stamp a model number under the spout or on the original box, and you can order the exact stem cartridge. If you don’t, a “faucet stem identification chart” at the hardware store, matched against your physical part, gets you there. Universal stem kits exist, but they’re hit-or-miss; a genuine or precisely matched stem always seals better and lasts longer.
| Faucet type | Stem style | How to identify | Best replacement approach |
|---|---|---|---|
| Two-handle compression | Threaded brass stem + washer | Handles you twist several turns | Match old stem physically |
| Two-handle washerless | Ceramic-disc cartridge | Quarter-turn handles | Order by brand/model number |
| Single-handle | Ball or cartridge | One lever for hot & cold | Brand-specific cartridge kit |
| Widespread 3-hole | Two stems + separate spout | 8″ apart handles | Replace both stems as a pair |
One pro tip: if one stem has failed, the other side is usually not far behind. On a two-handle faucet that’s more than a decade old, replacing both stems at once means you won’t be back under the sink next season. If your faucet is a widespread three-hole setup, understanding the plumbing behind it helps — our piece on the widespread faucet tee, the hidden hub of your bathroom sink, explains how those connections tie together.
What are the most common mistakes when replacing a faucet stem?
The top mistakes are overtightening the new stem, forgetting to check the brass seat, and skipping plumber’s grease. Overtightening cracks the washer immediately, so you’ll be dripping again within days. Forgetting the seat means a pristine new stem presses against a pitted, worn surface and never fully seals. And skipping grease leaves you with a squeaky, hard-to-turn handle that wears the O-rings out fast.
- Not turning off the water first. Obvious, but it happens — and it turns a repair into a cleanup.
- Cranking the packing nut too hard. Snug, not gorilla-tight. Overtightening deforms the stem and stiffens the handle.
- Reusing a chewed-up washer or seat. Replace both while you’re in there; they’re pennies.
- Turning the water back on fast. A pressure spike against a loose fitting sprays everywhere. Open the shutoff slowly.
- Losing the tiny handle screw down the drain. Always plug the sink first.
If, after all this, the drip persists, the issue may be a worn valve seat that needs to be re-ground with a seat-dressing tool or replaced outright. And if the leak is coming from the sprayer or a different fixture entirely, don’t force a stem fix — diagnose the real source first, the way we do in our guide to fixing a leaky faucet yourself and deciding whether repair is worth it.
When should you replace the whole faucet instead of the stem?
Replace the entire faucet when the body is cracked, the finish is badly corroded, replacement stems are discontinued, or you’ve already rebuilt it once and it’s still leaking. A stem swap is the right call for a sound faucet with a worn valve; it’s the wrong call for a 20-year-old fixture where every part is fused with mineral scale and parts are no longer made.
Do the math: a stem costs $6–$15 and 30 minutes. A decent new bathroom faucet runs $60–$200. If you’re facing your third repair, or you dislike the faucet anyway, a full replacement gives you a fresh warranty and a modern finish. But for a solid brass faucet that just started dripping, the stem replacement is by far the smarter, cheaper move — and it’s genuinely satisfying to fix it yourself.
FAQ
How long does it take to replace a bathroom faucet stem?
For most people, 20 to 40 minutes. A clean, non-corroded compression faucet can be done in under half an hour. Budget extra time if the packing nut is seized or you need to run to the store to match the stem — which is why photographing the old part before you start saves a second trip.
Can I replace just one faucet stem, or do I need to do both?
You can replace just the one that’s leaking. Each handle on a two-handle faucet has its own independent stem. That said, if your faucet is more than 10 years old, replacing both stems at once is smart preventive maintenance — the second one usually fails within a year of the first.
Why does my faucet still drip after replacing the stem?
Almost always a worn valve seat or an overtightened washer. The new stem is only half the seal; it presses against a brass seat that may be pitted. Re-dress or replace the seat, and make sure you didn’t overtighten the packing nut, which flattens the fresh washer. Check the O-rings too if the leak is around the handle rather than the spout.
Do I need a special tool to remove a faucet stem?
Often, yes — a stem wrench (also sold as a shower valve socket set). Recessed stems sit too deep for a standard adjustable wrench to reach, and they use odd hex sizes. A stem wrench set is $8–$14 and handles nearly every size. For shallow stems, a deep socket or adjustable wrench may be enough.
Is replacing a faucet stem covered under warranty?
Many major faucet brands offer limited lifetime warranties that cover replacement cartridges and stems for the original owner — you often just contact the manufacturer with your model number and they ship the part free. Doing the labor yourself doesn’t void a parts warranty. Keep your model number and proof of purchase; it can turn a $15 repair into a $0 one.
What’s the difference between a faucet stem and a cartridge?
They’re closely related. “Stem” usually refers to the threaded brass valve in older compression faucets that uses a rubber washer, while “cartridge” refers to the sealed washerless unit (ceramic-disc or ball) in newer faucets. The replacement process is nearly identical — remove the handle and retaining nut, pull the old unit, drop in an exact match.
About the author & adeaga: This guide was written and technically reviewed by the adeaga fixtures team, drawing on years of hands-on faucet repair and installation across compression, cartridge, and washerless valve designs. adeaga specializes in faucets, shower systems, and bathroom fixtures, and every repair method we publish is tested against real fixtures before it goes live. We reference manufacturer specifications and standards such as ASME A112.18.1 / CSA B125.1 for faucet performance, and we always recommend checking your fixture’s warranty before buying parts — many stems and cartridges are replaced free for the original owner. When in doubt about your specific model, contact the manufacturer or reach out to us at adeaga.net.