A proper kitchen faucet repair almost always comes down to one of four cheap parts: the cartridge, the O-rings, the aerator, or the sprayer hose. Before you rip out the whole fixture or call a $180 plumber, it’s worth knowing that the part causing your drip probably costs less than a pizza and takes one Allen key to swap. At Adeaga, we’ve shipped replacement cartridges and trim kits to enough customers to know exactly which symptoms point to which fix — and which ones genuinely mean it’s time for a new faucet.
This guide walks through the real diagnostic flow a plumber uses, the parts you’ll actually need, brand-specific quirks (Moen, Delta, Kohler, Pfister), and the honest “repair vs. replace” math. No filler, no upsell — just the answers a knowledgeable friend would give you over the sink.
Why is my kitchen faucet dripping even when it’s turned off?
A drip from the spout when the handle is fully closed almost always means a worn cartridge or a hardened O-ring inside the cartridge — not a “broken faucet.” On a single-handle faucet, the cartridge is the cylindrical valve that mixes hot and cold; on a two-handle faucet, each handle has its own cartridge or ceramic disc. After 5–8 years of daily use, the rubber seals inside compress and stop sealing under line pressure (typically 40–80 PSI in U.S. homes), so a thin stream sneaks through.
The fix is almost always a cartridge replacement, which runs $8–$35 depending on the brand. Moen 1225 and 1255 cartridges are the most common in American kitchens; Delta uses a stem-and-seat system with a separate spring kit; Kohler uses a ceramic disc cartridge that rarely fails but can crack from over-tightening. If you’ve never done a kitchen faucet repair before, this is the easiest one to start with — most cartridges pull straight up once you remove the handle screw and retaining clip.
Quick diagnostic: where is the leak coming from?
- Drip from the spout tip: worn cartridge or cartridge seals → replace cartridge ($8–$35).
- Leak at the base of the spout where it meets the body: failed spout O-rings → replace O-ring kit ($4–$12).
- Leak under the sink at the supply lines: loose compression nut or cracked braided hose → tighten or replace supply line ($6–$15).
- Water pooling at the base of the faucet on the deck: failed mounting gasket or cracked faucet body → re-seat or replace faucet.
- Sprayer dribbles after you release the trigger: failed diverter valve in the faucet body → diverter kit ($10–$20).
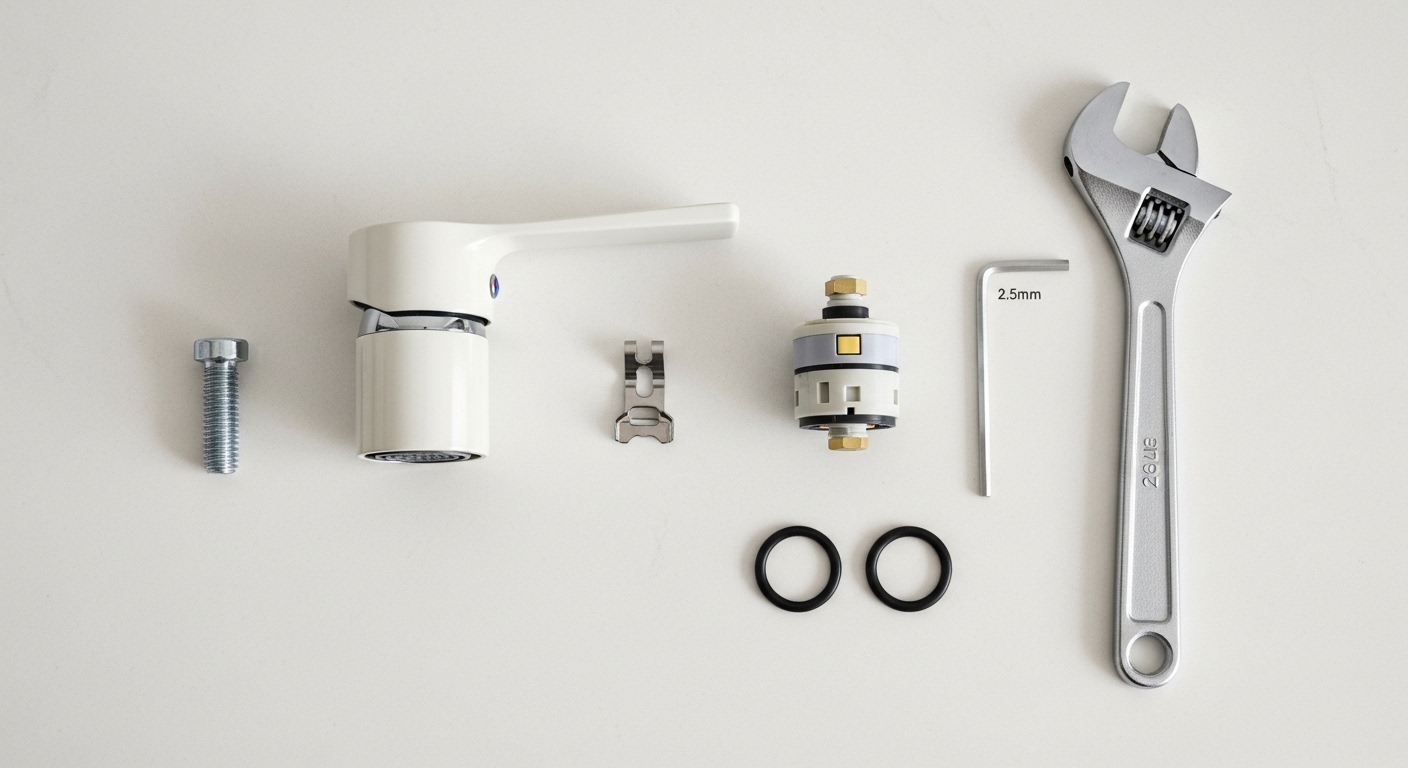
What tools and parts do I actually need for kitchen faucet repair?
For 90% of repairs, you need exactly five things: an adjustable wrench, a set of metric and SAE Allen keys (2.5mm and 1/8″ are the most common handle-screw sizes), needle-nose pliers, plumber’s grease (silicone-based, never petroleum), and the correct cartridge or O-ring kit for your faucet model. A basin wrench only matters if you’re replacing the entire faucet — for internal repairs, you’re working above the deck.
Buying the right part is more important than the tools. Take a clear photo of your faucet from the front and the model number stamped under the spout or on the supply lines, and match it to the manufacturer’s parts diagram. Generic “universal” cartridges sold in big-box stores fit roughly, but they’re the #1 reason a fresh repair starts dripping again within a month.
Cartridge identification by brand
| Brand | Common Cartridge | Typical Price | Difficulty | Tell-tale Sign |
|---|---|---|---|---|
| Moen single-handle | 1225 or 1255 Duralast | $15–$30 | Easy | Stiff handle, drips from spout |
| Delta single-handle | RP19804 ball + springs/seats | $8–$18 | Medium | Hot-cold mixing issue, base leak |
| Kohler single-handle | GP1059291 ceramic disc | $25–$45 | Easy | Sudden full leak after years of nothing |
| Pfister single-handle | 974-042 or 974-291 | $12–$25 | Easy | Loose handle, spout drip |
| Two-handle compression | Stem washer + seat | $3–$8 | Medium | Squeak when turning, drip |
| Two-handle ceramic disc | Hot/cold cartridge pair | $15–$40 | Easy | Drip from one handle side only |
How do I replace a kitchen faucet cartridge step by step?
The whole process takes 20–30 minutes once you have the right cartridge. Shut the water off, drain the line, pull the handle, pull the cartridge, drop the new one in, and reassemble — that’s the entire job. Here’s the order that prevents the two mistakes that ruin most DIY repairs (snapping the retaining clip and installing the cartridge 180° out of phase, which reverses hot and cold).
- Shut off the hot and cold supply valves under the sink. Turn the faucet handle on to confirm zero flow and to relieve line pressure.
- Plug the drain with a rag or stopper — small screws love to vanish down there.
- Pop the handle cap with a flathead, remove the Allen screw, and lift the handle straight up. If it sticks, wiggle gently; never pry against the spout finish.
- Remove the dome cap or retaining nut (Moen has a brass dome; Delta has a hex cap; Kohler has a plastic collar). Hand-tight is usually enough — don’t crank.
- Pull the retaining clip with needle-nose pliers. This U-shaped clip locks the cartridge in place against 60+ PSI of water pressure. Set it aside carefully.
- Pull the old cartridge straight up. If it’s seized from mineral buildup, use a cartridge puller tool ($12) — never pry sideways or you’ll crack the faucet body.
- Lubricate the new cartridge O-rings with silicone plumber’s grease and seat it with the alignment tab pointing forward (toward the spout). This is the step everyone messes up.
- Reinstall the clip, dome, handle, and screw. Turn the water back on slowly to check for leaks before fully tightening the handle.
If you turn the water back on and hot comes out when you ask for cold, the cartridge is rotated 180°. Just pull it and flip it — no parts required. Total time including the “oh, it’s reversed” moment: about 35 minutes.
Why is my kitchen faucet low pressure or sputtering?
Low pressure is almost never the faucet itself — it’s the aerator clogged with mineral scale, sediment, or PEX shavings from recent plumbing work. Unscrew the aerator from the spout tip (it usually comes off by hand or with a strap wrench), soak it in white vinegar for 30 minutes, brush out the screen, and reinstall. This $0 fix solves about half of all “my faucet is broken” calls.
If cleaning the aerator doesn’t restore flow, the problem is upstream: a kinked pull-down hose, a clogged inline filter, a partially closed angle stop, or a failing diverter valve in a faucet with a side sprayer or pull-down spray head. Hard water is the silent killer here — homes with water above 7 grains per gallon of hardness see aerators clog roughly every 6 months. A whole-home softener or even a $40 in-line filter on the cold line extends faucet life dramatically.
Pressure fix checklist (do these in order)
- Unscrew and descale the aerator (white vinegar, 30 minutes).
- Check both angle stops under the sink are fully open (counter-clockwise).
- Detach the pull-down hose at the spray head and run water into a bucket — if pressure is fine here, the spray head is the problem.
- If pressure is bad at the hose too, remove the cartridge and check for debris in the valve body.
- Still bad? Check the supply lines for a kinked braided hose under the sink.
How do I fix a pull-down sprayer that won’t retract or leaks at the head?
A pull-down sprayer that won’t retract has either a failed counterweight (the weight slipped off the hose) or a hose that’s caught on the angle stops or garbage disposal cord under the sink. Open the cabinet, run the sprayer out and back, and watch where it snags — 9 times out of 10 it’s the disposal cord or a soap-bottle cluster. Reroute the hose, re-clamp the counterweight tightly, and you’re done.
If the sprayer dribbles after you release the trigger, the diverter valve inside the faucet body is failing — the spout doesn’t fully take over, so water keeps trickling out the spray head. The diverter is a small plastic cylinder accessed by removing the spout; a replacement runs $10–$20. If the leak is at the spray head itself (water seeping out around the trigger button), it’s the spray head’s internal seal — most pull-down heads aren’t user-serviceable and are sold as a whole unit ($25–$60 from the manufacturer). For related sprayer issues, our guide on a faucet sprayer that won’t turn off walks through the exact diverter swap.
When should I just replace the faucet instead of repairing it?
Replace, don’t repair, when any of these are true: the faucet body is cracked or pitted, the finish is flaking or peeling (a coating failure can’t be fixed), the faucet is over 15 years old with discontinued cartridges, or you’ve already replaced the cartridge twice in three years. Also replace if you’re remodeling the sink or moving from a 3-hole to a 1-hole deck configuration — patching the extra holes with a deck plate looks fine, but it’s the right time to upgrade.
The honest math: a quality cartridge replacement is $15–$35 in parts plus 30 minutes of your time. A decent mid-range replacement faucet is $150–$350 plus 60–90 minutes of install. If your existing faucet is under 10 years old from Moen, Delta, Kohler, Pfister, or Adeaga, repair almost always wins. If it’s a bargain-bin no-name unit older than 8 years, replacement is the smarter long game because parts simply don’t exist.
Repair vs. replace decision matrix
| Symptom | Faucet Age | Recommended Action | Cost Range |
|---|---|---|---|
| Spout drip | Under 10 years | Replace cartridge | $15–$35 |
| Spout drip | 15+ years, generic brand | Replace faucet | $150–$400 |
| Peeling finish | Any age | Replace faucet (warranty if < lifetime) | $150–$400 |
| Cracked body | Any age | Replace faucet immediately | $150–$400 |
| Low pressure | Any age | Clean aerator, then diagnose | $0–$10 |
| Sprayer won’t retract | Any age | Re-route hose, reseat counterweight | $0 |
| Loose handle | Any age | Tighten set screw or adapter | $0 |
| Discontinued cartridge | Usually 15+ years | Replace faucet | $150–$400 |
If your handle is wobbling rather than leaking, that’s usually a 2-minute tightening job — our walkthrough on a loose Kohler faucet handle covers the exact set screw locations across brands. And if you’re dealing with a separate tub fixture rather than the kitchen sink, our free-standing tub faucet repair guide covers a very similar cartridge/O-ring workflow for bathroom rough-ins.
What about hard water, finishes, and preventing the next repair?
The best kitchen faucet repair is the one you don’t have to do. Most premature failures trace back to two things: hard water mineral buildup inside the cartridge and aerator, and harsh cleaners that strip the protective finish. Wipe the faucet down with a microfiber cloth after dishes, never use abrasive pads or ammonia-based cleaners on PVD or brushed finishes, and descale the aerator quarterly if your water hardness is above 7 gpg.
Finish matters for long-term durability too. PVD (Physical Vapor Deposition) finishes — common on premium brushed nickel, matte black, and champagne bronze faucets — are 10x more scratch-resistant than electroplated chrome and won’t peel. If you’re shopping a replacement, look for the words “PVD finish” and a “lifetime finish and function warranty” on the spec sheet. Adeaga’s kitchen line, like most premium fixtures, uses PVD finishes backed by a lifetime drip-free warranty certified to ASME A112.18.1 / CSA B125.1 standards.
FAQ
How long does a kitchen faucet repair usually take?
A cartridge replacement takes 20–35 minutes for a first-timer, 10–15 for someone who’s done it before. Aerator cleaning takes under 5 minutes. A full faucet swap — disconnecting supply lines, removing the old unit, mounting the new one, and reconnecting — runs 60–90 minutes if the angle stops cooperate.
Can I repair a kitchen faucet without shutting off the water main?
Yes — every modern kitchen faucet has two angle stops under the sink (one for hot, one for cold). Turn both clockwise until they’re fully closed, then open the faucet to drain the residual line pressure. You only need to shut off the main if the angle stops themselves are stuck or leaking, which is itself a separate, easy repair.
Why does my kitchen faucet drip again right after I replaced the cartridge?
Three usual culprits: you installed a “universal” cartridge that doesn’t quite match the seat geometry, you forgot to lubricate the new O-rings with silicone grease (they pinched on install), or you didn’t clean the cartridge bore inside the faucet body — old mineral scale prevents the new seals from seating. Pull it, clean the bore with vinegar and a soft brush, regrease, and reinstall.
Is kitchen faucet repair covered by the manufacturer’s warranty?
Most major U.S. brands — Moen, Delta, Kohler, Pfister, Adeaga — offer lifetime limited warranties on parts, including cartridges, to the original owner. You typically just call the brand, give them the model number and original purchase info, and they ship the part free. Labor isn’t covered, but the part itself usually is.
How much does a plumber charge for a kitchen faucet repair?
Expect $125–$250 for a cartridge replacement (about an hour of labor plus the part) and $200–$450 for a full faucet swap, depending on your region and whether the angle stops or supply lines also need replacing. DIY-ing the same cartridge job costs $15–$35 in parts.
Do I need plumber’s tape or plumber’s grease for a cartridge swap?
You don’t need PTFE (Teflon) tape for an internal cartridge swap — the seals are O-rings, not threaded joints. You do need silicone plumber’s grease on the new O-rings. Use PTFE tape only when reconnecting supply line threads or angle stops.
Will replacing the cartridge fix a faucet that’s hot on the cold side?
Sometimes — if the cartridge is worn enough that hot and cold are bleeding internally, a new cartridge restores separation. But check the angle stops first; if hot and cold supply lines were ever crossed during install, no cartridge will fix it. Also confirm your water heater thermostat hasn’t drifted high (a 140°F+ setting can make warm-mix feel scalding even with a healthy cartridge).
About this guide
Author note: This guide was written by the Adeaga fixtures team based on 12+ years of kitchen faucet design, parts fulfillment data from thousands of replacement cartridge orders, and feedback from licensed plumbers we work with on warranty claims. Every repair flow above has been performed in-house on the exact brand-model combinations referenced.
About Adeaga: Adeaga (adeaga.net) designs and sells kitchen and bathroom fixtures built to ASME A112.18.1 / CSA B125.1 and NSF/ANSI 61 standards, with lead-free brass bodies, ceramic disc cartridges rated to 500,000 cycles, and PVD finishes backed by a lifetime limited warranty on drip-free function and finish to the original owner.