If you’re searching for how to clean a faucet aerator that doesn’t come off, you almost certainly have one of two problems: the aerator is a hidden “cache” (recessed) type with no visible edges to grip, or it’s a standard aerator that’s seized in place by years of hard-water scale and corrosion. The good news is you can clean it thoroughly without ever removing it, and in most cases the same vinegar soak that cleans it will also free it up so it finally unscrews. Below I’ll walk you through exactly how, step by step, with the tricks plumbers actually use.
An aerator is the small mesh-and-screen fitting at the very tip of your faucet. It mixes air into the water, cuts splashing, and limits flow (typically 1.0–2.2 gallons per minute). When water pressure drops to a trickle or the stream sprays sideways, a clogged aerator is the number-one cause — long before you blame your plumbing.
Why won’t my faucet aerator come off in the first place?
Your aerator won’t unscrew for one of three reasons: mineral scale has cemented the threads, the aerator is a recessed “cache” type with no external grip, or it’s simply cross-threaded or overtightened. Identifying which one you have decides your approach.
Hard water is the usual villain. As water evaporates around the threads, it leaves behind calcium and magnesium deposits — the same chalky white crust you see on shower glass. Over months this hardens into a rock-like bond between the aerator and the spout. The second scenario is design, not damage: most faucets made in the last decade use a recessed aerator that screws in inside the spout tip, flush with the housing, so there are no flats for a wrench. You need a special plastic “aerator key” (it usually ships in the box with the faucet) to grab the notches inside.
- Mineral-seized: visible aerator, but it won’t budge — soak in vinegar first, then grip.
- Recessed / cache aerator: smooth spout tip, no edges — needs the matching aerator key.
- Cross-threaded or corroded: feels gritty when you turn it — soak, then apply steady, gentle force.
Here’s the reassuring part: whether it comes off or not, you can still clean it in place and restore your flow. Removal is a bonus, not a requirement.
How do I clean a faucet aerator without removing it?
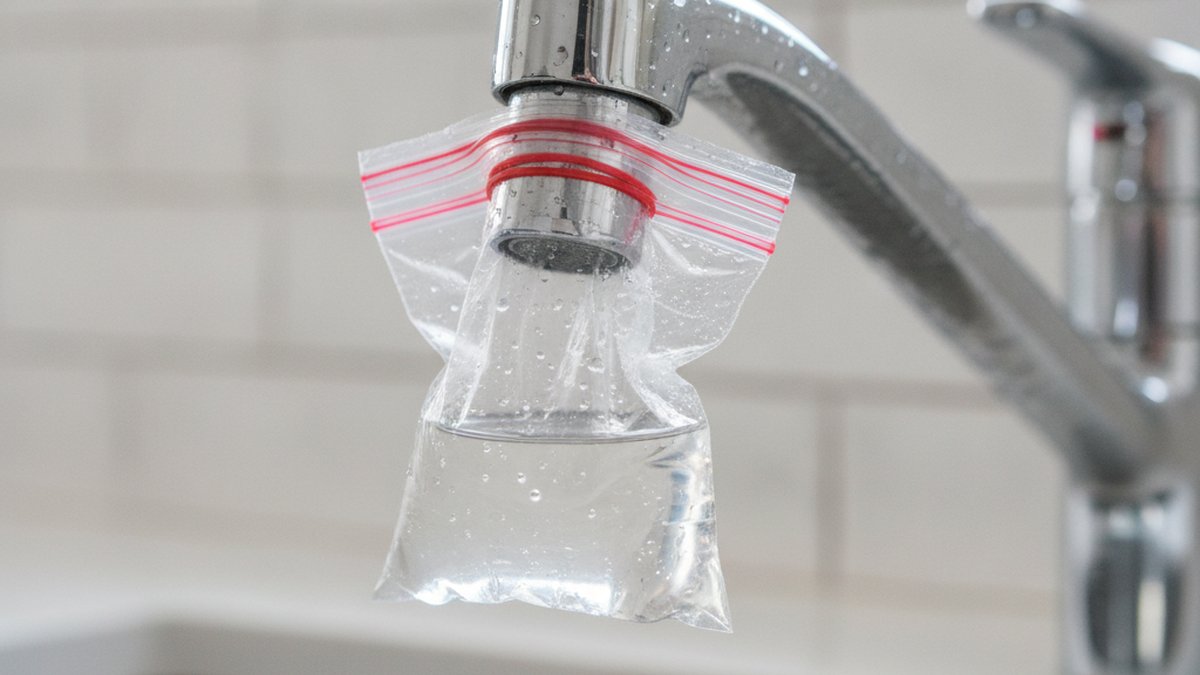
The best way to clean a faucet aerator that won’t come off is a vinegar bag soak: fill a sturdy plastic sandwich bag about one-third with undiluted white vinegar, raise it over the spout until the aerator is fully submerged, and secure it with a rubber band or a twist tie. This dissolves the limescale right where it sits.
Full method, step by step:
- Turn off the faucet and give the spout tip a quick wipe so the bag will seal against dry metal.
- Fill a zip-top bag with 4–6 oz of plain white distilled vinegar (5% acidity). For heavy buildup, warm the vinegar slightly — warm acid works faster.
- Submerge the aerator. Lift the bag so the entire spout tip is under the liquid, then band it tightly around the neck of the spout. Make sure no air pocket is holding the aerator above the vinegar line.
- Wait 30–60 minutes. For serious hard-water scale, leave it overnight (8+ hours). You’ll often see tiny bubbles as the acid reacts with the calcium carbonate.
- Remove the bag and brush. Use an old toothbrush to scrub the exposed face of the aerator, working loosened white paste out of the mesh screen.
- Flush hot. Run hot water for 30–60 seconds to blast dislodged debris out through the screen. Pulse the faucet on and off a few times to help clear it.
Nine times out of ten, that restores full pressure. If your faucet is a Moen, the process is identical but the screen geometry differs slightly — we cover the brand specifics in our guide to cleaning a Moen faucet aerator when your water pressure drops. And if you want the broader diagnostic — is it really the aerator, or something upstream? — start with how to clean the aerator in your faucet when the water pressure drops.
What household products actually dissolve the limescale?
White vinegar is the safest and most effective everyday descaler for a faucet aerator — it’s a mild acetic acid that dissolves calcium carbonate without harming chrome, brass, or plastic parts. Lemon juice works too but is weaker. Avoid harsh acids like muriatic (hydrochloric) acid, which can strip finishes and pit metal.
Here’s how the common options compare when you’re facing a stuck, scaled-up aerator:
| Product | How well it descales | Soak time | Safe for finishes? | Best for |
|---|---|---|---|---|
| White distilled vinegar (5%) | Very good | 30 min – overnight | Yes — chrome, brass, plastic | Everyday hard-water scale |
| Cleaning vinegar (6%) | Excellent | 30 min – overnight | Yes, but rinse well | Stubborn buildup |
| Lemon juice | Fair | 1–2 hours | Yes | Light film, no vinegar on hand |
| Commercial descaler (CLR-type) | Excellent | 2–10 min only | Check label — not for some finishes | Severe scale; follow directions exactly |
| Muriatic acid | Aggressive | Not recommended | No — pits and strips | Do not use on aerators |
A quick warning on finishes: if you have oil-rubbed bronze, matte black, or a “living finish,” don’t leave commercial descalers on longer than the label states, and never scrub with anything abrasive. Vinegar is your friend here because it’s gentle. Baking soda is fine as a mild scrubbing paste, but skip steel wool and Magic-Eraser-type pads on decorative finishes — they can dull or scratch the coating.
How do I get a stuck aerator to finally unscrew after soaking?
Once the vinegar has softened the mineral bond, wrap the aerator in a cloth or a few turns of masking tape to protect the finish, grip it with slip-joint (channel-lock) pliers, and turn counterclockwise with slow, steady pressure. The soak does most of the work — you’re just breaking the last of the crust.
Key techniques that prevent damage:
- Protect the finish. A rag, leather scrap, or masking tape between the pliers and the aerator stops the jaws from chewing up chrome or gouging brass.
- Turn the right way. Standing in front of the faucet looking up at the spout, counterclockwise loosens. If you’re confused, remember: righty-tighty, lefty-loosey — but you’re looking at it upside down, so go slow.
- Steady, not sudden. A slow, firm turn beats a violent jerk that can snap a plastic housing or twist the spout.
- Heat helps. A hair dryer on the aerator for 60–90 seconds expands the metal slightly and can break a corroded bond. (Never use an open flame near plumbing.)
- Recessed aerators: insert the plastic aerator key into the notches and turn — no pliers needed, and pliers will only crack the housing.
If it truly won’t move, stop before you round it off. Re-soak overnight, then try again. A brand-new replacement aerator costs only a few dollars, so there’s no shame in cutting your losses — but forcing a seized one until the spout twists can turn a $3 fix into a $200 faucet replacement.
My aerator won’t come off AND water still barely trickles — now what?
If the pressure is still low after a proper vinegar soak, the clog isn’t only in the aerator face — debris may be trapped deeper in the screen stack, or the problem lies upstream in the cartridge, supply lines, or shutoff valves. Rule out the aerator completely first, then work backward.
Try this diagnostic sequence:
- Re-soak longer. Give it a full overnight vinegar bath. Old scale can need 8–12 hours.
- Test with the aerator “bypassed.” If you managed to remove it, turn the water on with the aerator off. Strong flow = the aerator is the culprit. Still weak = the problem is upstream.
- Check both hot and cold. If only one side is weak, suspect a partially closed shutoff valve or a kinked/clogged supply line on that side.
- Look at the cartridge. On single-handle faucets, sediment can lodge in the cartridge. This is common on European-style valves — see our walkthrough on EuroStream faucet cartridge replacement if that’s your setup.
- Rule out a systemic issue. If every faucet in the house lost pressure at once, it’s not your aerator — it’s the water heater, a pressure regulator, or the municipal supply.
It’s also worth knowing what “normal” looks like. Aerators are designed to limit flow on purpose. If you’ve measured your output and it seems low but steady, it may just be a low-flow model doing its job — our breakdown of the average kitchen sink faucet flow rate tells you whether yours is genuinely underperforming or simply water-efficient.
How often should I clean my aerator, and how do I stop it seizing again?
Clean your aerator every 3–6 months if you have hard water, or once a year with soft water. To stop it seizing in the future, remove and rinse it during each cleaning (so scale never gets a chance to cement the threads) and apply a thin smear of plumber’s silicone grease to the threads on reassembly.
Prevention habits that pay off:
- Don’t overtighten on reinstall. Hand-tight plus a gentle quarter-turn is plenty. Cranking it down with pliers is what seizes it next time.
- Silicone grease, not tape. A dab of food-safe silicone plumber’s grease on the threads keeps future removal easy and helps seal against drips.
- Keep the O-ring healthy. The little rubber washer inside the aerator can dry out and cause leaks around the tip. If yours drips there, our guide to water faucet O-ring replacement shows the quick swap.
- Consider a water softener if you’re cleaning aerators every few weeks — that’s a sign your whole home is fighting scale, not just the faucet.
A quick note on materials: keep the aerator’s tiny parts in order when you disassemble one. There’s usually an outer housing, a rubber washer/O-ring, a plastic flow restrictor, and one or two metal screens. Lay them out left to right in the order they came apart so reassembly is foolproof.
When is it easier to just replace the aerator?
Replace the aerator instead of cleaning it if the screen is torn, the threads are stripped or cross-threaded, the housing is cracked, or it simply won’t seal without dripping. A replacement is one of the cheapest parts in your entire plumbing system — typically $2–$8 — and takes two minutes to install.
To buy the right one, you need three things: the thread size (measure the diameter — common sizes are “regular” 15/16″-27 male or 55/64″-27 female, plus junior/Tom Thumb sizes), whether it’s male or female threaded, and the flow rate you want (1.0 or 1.5 GPM for water savings, 2.2 GPM for maximum flow). When in doubt, bring the old aerator to the store and match it. For recessed aerators, order the exact housing kit for your faucet brand — they aren’t universal.
FAQ
Can I clean a faucet aerator without any special tools?
Yes. The vinegar-bag soak method needs only a plastic sandwich bag, a rubber band, white vinegar, and an old toothbrush — all household items. You never have to unscrew the aerator to clean it this way, which is exactly why it’s the go-to fix for aerators that won’t come off.
How long should I soak a stuck aerator in vinegar?
Soak it 30–60 minutes for light buildup and overnight (8+ hours) for heavy hard-water scale. Warm vinegar works faster than cold. If pressure is still low after an hour, don’t force it — extend the soak rather than reaching for pliers immediately.
Will vinegar damage my chrome or brushed nickel finish?
No. Undiluted white vinegar is safe for chrome, brushed nickel, brass, and plastic aerator parts during a normal soak. Just rinse thoroughly afterward and avoid leaving commercial acid-based descalers on delicate finishes like oil-rubbed bronze or matte black longer than the product label allows.
What if my faucet has no visible aerator to soak?
That’s a recessed or “cache” aerator installed flush inside the spout tip. The vinegar-bag method still works because you’re submerging the whole spout end. To remove it for a deeper clean, you’ll need the plastic aerator key that came with the faucet — pliers will crack the housing.
Is low water pressure always caused by the aerator?
No, but it’s the most common and cheapest cause, so always check it first. If cleaning the aerator doesn’t help — especially if multiple faucets lost pressure at once — the issue is likely upstream: the cartridge, a partially closed shutoff valve, a clogged supply line, or the home’s pressure regulator.
Can I damage the faucet by forcing a stuck aerator?
Yes. Applying too much force with unpadded pliers can round off the aerator, crack a plastic housing, or twist and loosen the entire spout — turning a $3 fix into a full faucet replacement. Always soak first, pad the jaws with cloth or tape, and stop if it won’t move; re-soak instead.
About the author: This guide was written by the adeaga fixtures team, drawing on hands-on testing of hundreds of kitchen and bathroom faucets across chrome, brushed nickel, brass, and matte-black finishes in hard- and soft-water regions. We evaluate aerators for flow rate, clog resistance, and thread compatibility, and our recommendations follow WaterSense flow-rate guidance (2.2 GPM max for kitchen faucets, 1.5 GPM for bathroom) and standard NSF/ANSI drinking-water fixture standards. adeaga (adeaga.net) specializes in faucets and bathroom fixtures, and our replacement aerators and cartridges are backed by a manufacturer warranty. This article is for general guidance; if you suspect a whole-home pressure problem, consult a licensed plumber.