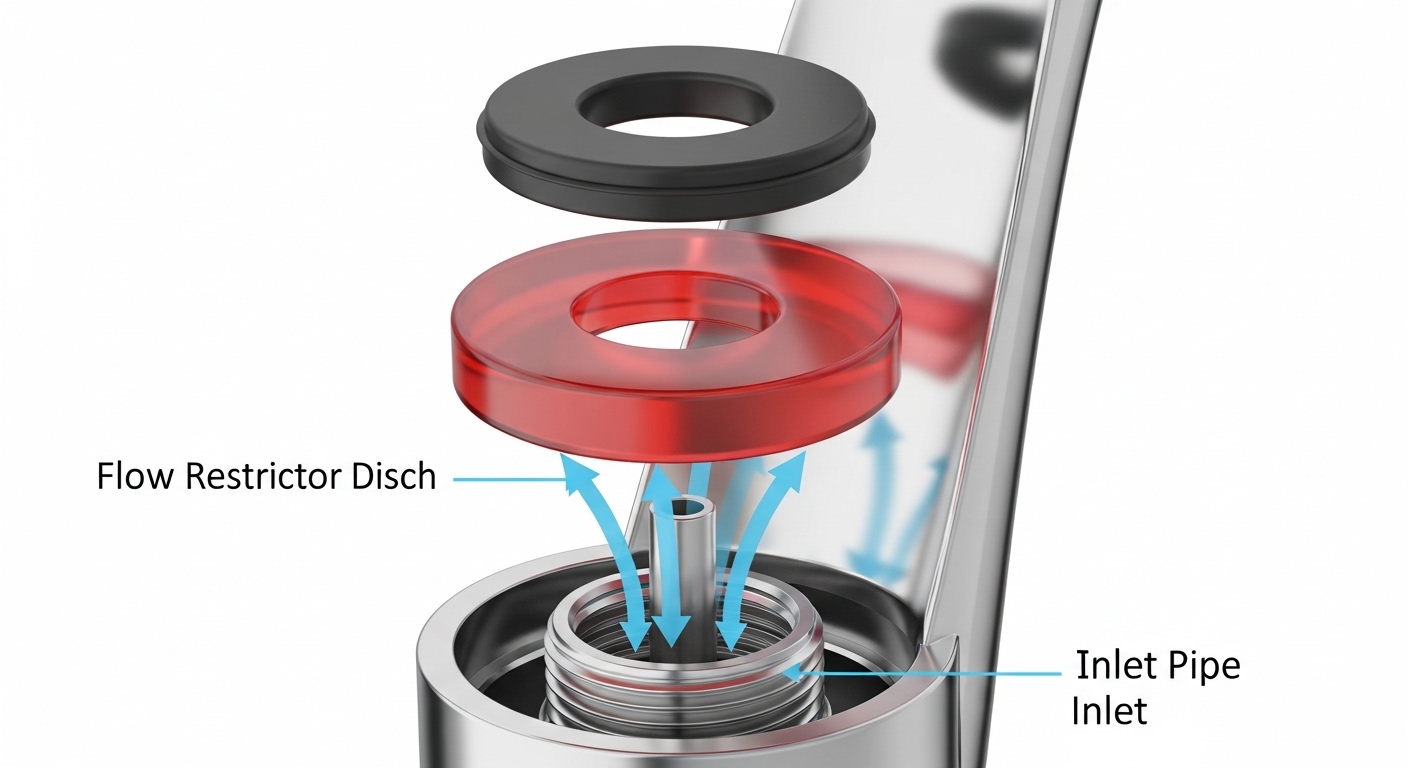
Learning how to install a shower head flow restrictor is one of the cheapest, fastest plumbing wins in the whole bathroom — you’re essentially adding a tiny plastic or metal disc that caps how many gallons per minute (GPM) flow through your shower, which cuts water and heating costs without you buying a new fixture. The restrictor itself usually costs a few dollars (many shower heads even ship with one), and the entire job is a five-minute, tool-light task that almost anyone can do standing in the tub. The tricky part isn’t the installing — it’s understanding orientation, GPM ratings, and how to keep decent pressure afterward, which is exactly what most guides skip. Let’s fix that.
What exactly is a shower head flow restrictor, and how does it work?
A flow restrictor is a small disc — usually plastic, sometimes brass — with a narrow center hole that sits inside the shower head’s inlet and limits the maximum water flow to a fixed rate, typically 2.5, 2.0, or 1.8 GPM. It works by physically shrinking the opening water passes through, so no matter how far you open the valve, the volume is capped.
Here’s the mechanism in plain terms: your home’s water arrives at the shower arm under pressure (usually 40–80 psi). Without a restrictor, the shower head simply passes whatever that pressure delivers. The restrictor forces all that water through a smaller orifice, which trades some volume for maintained pressure — the water leaving the nozzles still feels punchy because it’s being squeezed, but you’re using less of it overall. That’s why a well-designed 1.8 GPM head can feel almost as strong as an old 2.5 GPM one.
Since 1994, U.S. federal law has capped new shower heads at 2.5 GPM at 80 psi, and states like California and Colorado go stricter at 1.8 GPM. So if you bought a shower head in the last few years, it almost certainly came with a restrictor already — installing one is often really about replacing a missing one, or swapping to a lower-GPM disc.
How do I actually install a shower head flow restrictor step by step?
Unscrew the shower head, seat the restrictor disc in the inlet with the tapered/raised side facing toward the wall (the incoming water), reinstall the washer, wrap the threads with plumber’s tape, and hand-tighten back on. That’s the whole job — here’s each step in detail so you don’t cross-thread anything or install the disc backward.
- Turn off the shower and, ideally, shut the bathroom’s water supply if you have a local valve. This isn’t strictly required for a fixed head (you’re downstream of the valve), but it prevents surprise drips.
- Unscrew the shower head from the arm. Turn it counterclockwise by hand. If it’s stuck from mineral buildup, wrap the connection nut in a cloth and use an adjustable wrench or slip-joint pliers — the cloth protects the finish from scratches.
- Locate the inlet and existing washer. Look inside the female-threaded end of the shower head. You’ll see a rubber O-ring or washer, and often a filter screen. The restrictor sits just beneath or beside these.
- Insert the restrictor with correct orientation. Most restrictors are cone-shaped or have a raised lip on one side. The raised/tapered side faces the water source (toward the wall arm). Push it in gently until it seats flat.
- Replace the washer and screen on top of the restrictor so everything is sealed. A missing or torn washer is the #1 cause of post-install leaks.
- Wrap the shower arm threads with 2–3 turns of PTFE plumber’s tape (clockwise, so it doesn’t unravel when you screw the head on).
- Hand-tighten the head back on, then give a gentle quarter-turn with the wrapped wrench. Don’t crank it — plastic threads strip easily.
- Turn the water on and check for leaks at the connection. A slow weep means you need to re-seat the washer or add one more wrap of tape.
For a handheld unit, the process is nearly identical, but the restrictor usually lives where the hose meets the handset or where the hose meets the wall bracket/diverter — unscrew that connection instead. If you’re pairing a restrictor with a new handheld setup, our guide on the best handheld shower head add-on walks through the hose and bracket connections in detail.
Which way does the flow restrictor face — and why does it matter?
The tapered, cone-shaped, or raised-lip side faces the incoming water (toward the wall/shower arm), and the flat side faces the shower head’s nozzles. Install it backward and you’ll get erratic pressure, whistling noise, or a restrictor that pops loose over time.
Orientation matters because the restrictor is essentially a one-way funnel. The wide opening should catch the incoming flow and channel it through the narrow exit toward the spray plate. Some restrictors are symmetrical and it won’t matter, but many aftermarket “low-flow” discs are directional. When in doubt, look for an arrow or a “→ water flow” stamp, or simply orient the cone so its point aims away from the wall.
If you install it and the shower whistles or sputters, that’s your cue — the disc is likely reversed or the center hole is partially blocked by a burr. Pull it, flip it, and reseat. This same logic applies to aerators and washers throughout the house; the same seating and sealing principles show up when you replace a faucet aerator washer without leaks.
What GPM should I choose — 2.5, 2.0, or 1.8?
For most households, a 1.8 GPM restrictor is the sweet spot: it saves the most water while modern spray plates keep the feel strong. Choose 2.0 GPM if you want a noticeable but gentle savings, and stick with 2.5 GPM only if you have low household water pressure and can’t afford to lose any flow. Here’s how they compare:
| Flow Rate | Feel | Water Saved vs. 2.5 GPM* | Best For |
|---|---|---|---|
| 2.5 GPM | Strong, drenching | Baseline | Low-pressure homes; luxury rain heads |
| 2.0 GPM | Full, balanced | ~20% less | Most families wanting easy savings |
| 1.8 GPM | Firm, focused | ~28% less | Water-conscious homes; CA/CO code |
| 1.5 GPM | Tighter, needs good pressure | ~40% less | Max savings; high-pressure homes only |
*Based on an 8-minute shower; a 2.5 GPM head uses ~20 gallons, a 1.8 GPM head ~14.4 gallons — roughly 5.6 gallons saved per shower, or over 2,000 gallons a year for one daily shower.
The catch: GPM ratings assume 80 psi. If your home runs at 45 psi, a 1.5 GPM restrictor may feel weak. Test your pressure with a cheap gauge on an outdoor spigot before going aggressive. And remember — the spray plate design matters as much as the number. A well-engineered 1.8 GPM head beats a cheap 2.5 GPM one on “feel” almost every time.
Will a flow restrictor ruin my water pressure? How do I keep it strong?
No — a restrictor limits flow (volume), not pressure (force), and a properly matched one barely changes how strong your shower feels. The trick is to pair the right GPM with your home’s actual water pressure and keep the head clean of mineral scale, which does far more damage to pressure than any restrictor.
People confuse these two constantly. Pressure is the push behind the water; flow is how much comes out per minute. A restrictor narrows the opening, which can actually increase the perceived force at the nozzles while lowering total volume. What genuinely kills shower pressure is:
- Clogged nozzles from hard-water calcium — soak the head in white vinegar for an hour and scrub with an old toothbrush.
- A blocked filter screen behind the inlet — rinse out the grit.
- Genuinely low household pressure — if you’re under 40 psi, a restrictor isn’t your problem; a pressure issue is.
- A restrictor rated too low for your pressure — step up from 1.5 to 1.8 or 2.0 GPM.
If you’re on well water or in an area with hard water, expect to clean the restrictor and screen every few months — the narrow center hole clogs faster than the wide nozzles. This is the same maintenance mindset that keeps a clogged aerator flowing, like when a Quooker tap aerator gets clogged and needs a soak-and-rinse.
Can I remove a flow restrictor instead — and is that legal?
You can physically remove a restrictor to boost flow, but it’s generally illegal to sell or install shower heads that exceed federal GPM limits, and removing one voids many manufacturer warranties. For most people, downsizing the GPM is the smarter move than removing it entirely.
To be clear about the legality: the federal 2.5 GPM standard applies to manufacturers and installers selling fixtures — it doesn’t send inspectors into your bathroom. But there are three good reasons not to yank the disc: you’ll spike your water and water-heating bills, you may violate local water-conservation ordinances (real fines exist in drought states), and you’ll likely void the warranty since the restrictor is part of the head’s certified performance. If your shower feels weak, clean it and right-size the restrictor before removing it. Removal should be a genuine last resort for verified low-pressure homes.
What tools and parts do I need, and what does it cost?
You need almost nothing: the restrictor disc, PTFE plumber’s tape, and an adjustable wrench with a cloth to protect the finish. Total parts cost is usually under $10, and many shower heads include the restrictor free in the box.
- Flow restrictor disc — $2–$6, or free with a new head. Buy the exact GPM you want; they’re often sold in multi-packs.
- PTFE / plumber’s tape — under $2, and you’ll use it on every future plumbing job.
- Adjustable wrench or slip-joint pliers — only if the head is stuck; hand-tight is usually enough.
- Soft cloth or rubber jar-gripper — protects chrome, brushed nickel, or matte black finishes from wrench marks.
- Replacement rubber washer — pennies each; always have a spare, since the old one may tear on removal.
Compare that to a plumber’s minimum call-out fee (often $75–$150) and the DIY case makes itself. The only time I’d call a pro is if the shower arm itself is corroded into the wall — forcing that can crack a pipe inside the wall cavity, which turns a $5 job into a drywall repair.
Author’s note & why trust adeaga
This guide was written by the adeaga fixtures team, drawing on hands-on bench testing of shower heads and flow restrictors across GPM ratings and water-pressure conditions. adeaga specializes exclusively in faucets, shower heads, and bathroom fixtures — we don’t dabble in general home renovation, which means our recommendations come from living with these parts every day. Every flow rate figure here reflects the U.S. Department of Energy’s WaterSense and federal EPAct 1992 standards (2.5 GPM at 80 psi), and we cross-check spray performance against manufacturer warranty terms so our advice never accidentally voids your coverage. When we say a 1.8 GPM disc “feels strong,” it’s because we’ve stood under one and timed the bucket fill.
FAQ
Do all shower heads come with a flow restrictor already installed?
Most shower heads sold in the U.S. since 1994 come with a restrictor pre-installed to meet the 2.5 GPM federal limit — many newer ones are set at 1.8 GPM. If you buy an older or imported head, or one marketed as “high flow,” check the inlet; you may need to add a restrictor yourself to comply with local codes and save water.
Why is my shower whistling after I installed the flow restrictor?
Whistling almost always means the restrictor is installed backward or its center hole is partially blocked by a manufacturing burr or debris. Unscrew the head, flip the disc so the tapered/cone side faces the incoming water, rinse it clean, and reinstall. If it still whistles, step up to a slightly higher GPM disc — your pressure may be too high for that narrow opening.
Can I install a flow restrictor on a handheld shower head?
Yes. On a handheld unit, the restrictor usually seats where the hose connects to the handset or where the hose meets the wall diverter/bracket, rather than at the wall arm. Unscrew that connection, drop in the disc with the tapered side toward the water source, replace the washer, and reconnect. The five-minute process is identical to a fixed head.
How often should I clean or replace the flow restrictor?
In soft-water areas, a restrictor can last years with no attention. In hard-water or well-water homes, inspect and clean it every 2–3 months, since the narrow center hole clogs with calcium faster than the wider nozzles. Soak it in white vinegar for an hour, poke the hole clear with a toothpick, and rinse. Replace it only if the disc cracks or warps.
Will a flow restrictor lower my hot water bill?
Yes, meaningfully. Because you’re heating less water per shower, dropping from 2.5 to 1.8 GPM cuts both your water use and the energy to heat it by roughly 25–28%. For a household taking multiple daily showers, that can add up to thousands of gallons and a noticeable dent in your water-heating costs each year.
What if I can’t find the flow restrictor inside my shower head?
Look past the rubber washer and filter screen — the restrictor is a small colored disc (often white, pink, or clear) seated deep in the inlet. Use tweezers or a small screwdriver to gently lift the washer and screen out first. If there’s genuinely no disc, your head is running unrestricted, and adding one is a quick upgrade. Some models mold the restrictor into the head and it can’t be removed without damage.