If you’ve landed here searching for garden hose faucet leak repair, you’re almost certainly staring at a wet foundation, a puddle under the spigot, or a steady drip that’s spinning your water meter at 3 a.m. The good news: outdoor faucets — also called hose bibbs, sillcocks, or wall hydrants — are one of the most repair-friendly fixtures in your entire plumbing system. The better news: with a $4 washer, a $9 vacuum breaker kit, or in the worst case a $40 frost-free replacement bibb, you can almost always stop the leak today without calling a plumber.
At Adeaga, we manufacture and stock the full range of replacement parts, anti-siphon vacuum breakers, and frost-free wall hydrants that homeowners and pros reach for when an outdoor faucet fails. This article is the in-house repair playbook our customer-service team walks callers through every spring — published in full so you can fix the leak yourself, and shop with confidence if you decide it’s time for an upgrade.
Why Garden Hose Faucet Leak Repair Matters More Than You Think
A “minor” outdoor drip is rarely minor. A spigot leaking one drop per second wastes roughly 5 gallons a day — over 1,800 gallons a year. But the bigger problem is structural: water tracking down the side of your house can rot sheathing, corrode the rim joist, and freeze inside the wall every winter until the supply line itself splits. That’s the repair bill that turns a $15 washer job into a $3,000 drywall-and-pipe replacement.
Effective garden hose faucet leak repair starts with knowing exactly where the water is coming from, because four very different failures produce nearly identical-looking puddles. Misdiagnose it, and you’ll replace the wrong part and the drip will be back in a week.
The Four Places an Outdoor Faucet Leaks
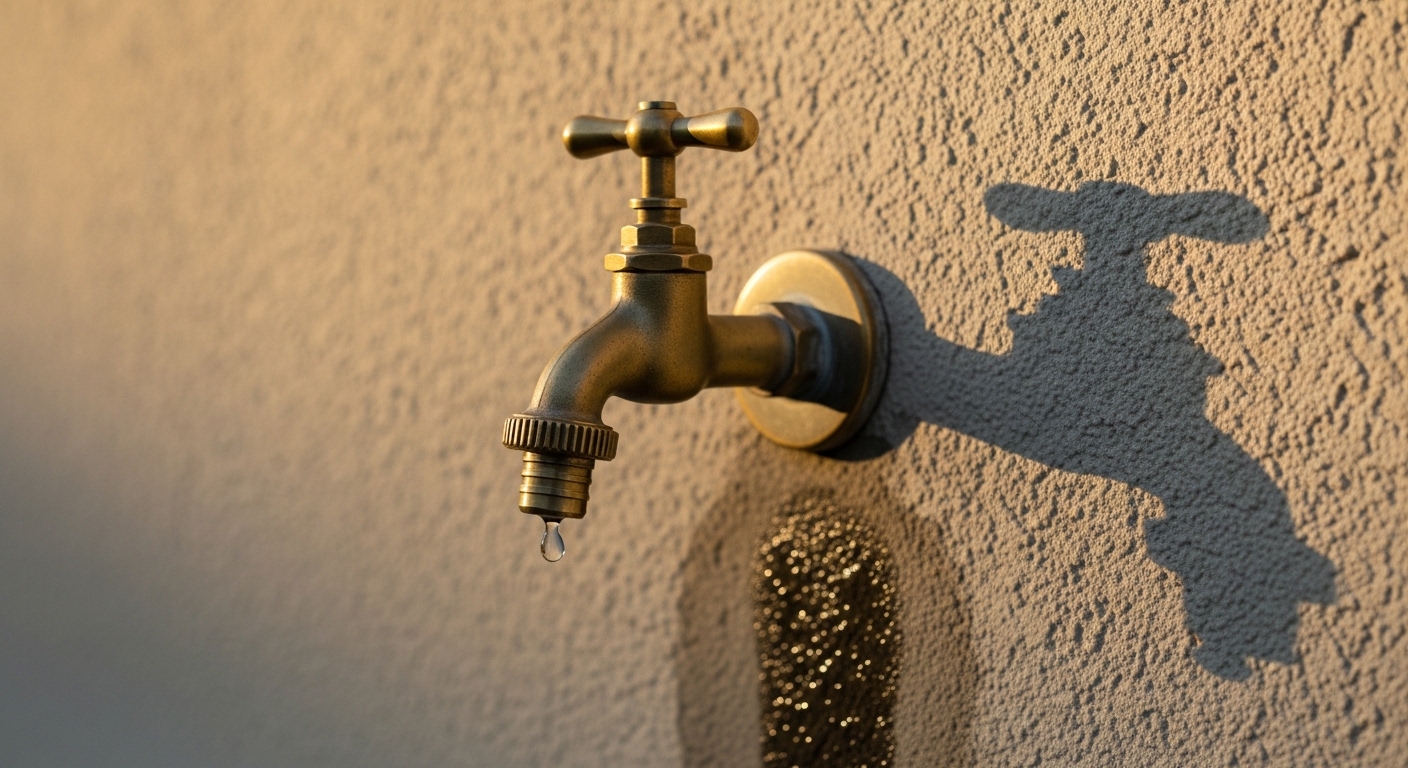
- From the spout when the handle is OFF — almost always a worn rubber washer or damaged valve seat inside the bibb.
- From around the handle/stem when the handle is ON — the packing nut is loose, or the packing washer/O-ring under it has flattened.
- From the vacuum breaker on top — the small atmospheric vacuum breaker (AVB) cap has a cracked diaphragm or stuck check.
- From the threaded hose connection — the hose washer inside your garden hose’s coupling is missing, torn, or compressed.
Each of these has a different fix. The next sections cover all four, in the order you should diagnose them.
Tools and Parts You’ll Need for Garden Hose Faucet Leak Repair
Before you turn off the water, lay out your kit. A repair stalls fast when you’re hunting for an adjustable wrench with wet hands.
- Adjustable wrench (8″) and a second one or channel-lock pliers for the packing nut
- Flat and Phillips screwdrivers
- Replacement bibb washer assortment (1/2″, 9/16″, and 5/8″ flat washers cover 95% of U.S. hose bibbs)
- Brass bibb screws (the originals are usually corroded solid)
- Graphite packing string OR a packing washer/O-ring kit
- PTFE (Teflon) tape — white for water
- Replacement vacuum breaker cap, if yours is the screw-on type
- White vinegar and a stiff brush for descaling the valve seat
If the faucet is older than about 15 years and the body is corroded green or the threads on the spout are stripped, skip the repair and go straight to replacement — we’ll cover that path below.
Step-by-Step: Garden Hose Faucet Leak Repair from the Spout
This is the most common failure by a wide margin. Water dribbles from the end of the spout even when the handle is fully closed. Here’s the fix.
- Shut off the water supply. Find the dedicated shutoff valve for the outdoor line (usually in the basement, crawlspace, or utility room directly inside the wall behind the spigot). If there isn’t one, shut off the whole-house main.
- Open the outdoor faucet to drain residual pressure. Leave it open.
- Remove the handle. Take out the handle screw on top, pull the handle straight off. If it’s stuck, a few taps with a wooden mallet usually frees it.
- Loosen the packing nut (the large hex nut directly under the handle) counterclockwise with your wrench.
- Unscrew the entire stem assembly by reinstalling the handle temporarily and turning counterclockwise (the “open” direction) — the stem will thread itself out of the bibb body.
- Inspect the washer at the very bottom of the stem. A flattened, grooved, or torn washer is your culprit. Remove the brass screw, swap in a new washer of the exact same diameter, and replace the screw.
- Check the valve seat inside the bibb body with a flashlight. If it’s pitted, the new washer will leak again within months — you’ll need a seat-dressing tool or a full bibb replacement.
- Reassemble in reverse order, snug the packing nut firmly but not crushingly, and slowly restore the water supply.
When the Leak Is Around the Handle Instead
If water only appears when you turn the faucet on, and it weeps from the base of the handle, the packing — not the washer — is failing. With the water off, snug the packing nut a quarter-turn clockwise and test. If that doesn’t stop it, remove the stem and either wrap two or three loops of graphite packing string around the stem under the packing nut, or swap the rubber packing washer/O-ring with a matching new one. This is a 10-minute fix.
Repairing or Replacing the Vacuum Breaker
Every code-compliant exterior hose bibb installed in the United States since the mid-1990s has an atmospheric vacuum breaker (AVB) screwed onto the top — the little dome- or cylinder-shaped cap. Its job is to prevent contaminated hose water from being siphoned back into your potable supply if pressure drops. When the internal diaphragm cracks, it sprays water out the top whenever you open the valve.
Fix: with the water off and the handle open, unscrew the vacuum breaker cap (a screwdriver in the security slot, or a snap-off ring on newer models) and replace the internal cartridge — or simply install a complete new AVB. Adeaga’s replacement AVBs are tested to ASSE 1011 standards and ship with a 5-year warranty, the same standard our wall hydrants are built to.
Repair vs. Replace: How to Decide
If you’ve already replaced the washer once and the bibb is leaking again, or you live in a climate that freezes, it’s almost always smarter to upgrade to a modern frost-free sillcock than to keep rebuilding the old one. Here’s the side-by-side our team uses when customers call in.
| Faucet Type | Typical Price | Freeze-Resistant? | Anti-Siphon Built In? | Best For | Expected Lifespan |
|---|---|---|---|---|---|
| Standard compression hose bibb | $12 – $20 | No | Sometimes (separate AVB) | Mild climates, shed/garage outlets | 8 – 15 years |
| Frost-free sillcock (8″ – 12″) | $30 – $55 | Yes | Yes (integrated) | Most U.S. homes | 20 – 30 years |
| Quarter-turn ball-valve hose bibb | $25 – $45 | No | Yes | High-use commercial, washdown | 15 – 20 years |
| Adeaga Pro-Series frost-free wall hydrant | $48 – $79 | Yes (rated to -30°F) | Yes (dual-check) | Cold-climate primary spigot | 25+ years (lifetime stem warranty) |
Notice how the price gap between a basic bibb and a frost-free unit is only about $30 — but the lifespan more than doubles and the freeze-burst risk drops to near zero. For any spigot that lives on an exterior wall in a climate with sub-freezing nights, the math overwhelmingly favors replacement.
How to Replace a Hose Bibb Without Calling a Plumber
If you’ve decided to swap the whole faucet, the job is genuinely DIY-friendly when the existing bibb threads onto a male adapter inside the wall (the most common configuration in homes built after about 1985).
- Shut off the water and drain the line by opening the bibb.
- Unscrew the old bibb counterclockwise using two wrenches — one on the bibb, one bracing the pipe inside the wall if accessible. This prevents twisting the supply line.
- Clean the male threads on the supply nipple with a wire brush.
- Wrap 4 – 6 turns of PTFE tape clockwise on the male threads.
- Thread the new bibb on by hand until snug, then wrench it 1.5 – 2 turns further until the spout points straight down.
- Restore water slowly, check every joint for weeping, and run the faucet for 60 seconds.
If the old bibb is sweated (soldered) directly to a copper stub-out, that’s a torch job — call a licensed plumber. You can tell by the absence of any visible threads where the bibb meets the wall.
Preventing the Next Leak: Winterization and Maintenance
The single biggest cause of “sudden” outdoor faucet leaks isn’t age — it’s freeze damage. Water left in the bibb expands as it freezes, splitting either the stem or, worse, the supply pipe inside the wall. The crack often doesn’t reveal itself until the first warm day in spring, when the faucet is turned on and water gushes into the basement.
- Disconnect every garden hose by late October (or before your first hard freeze).
- Even on frost-free models, leaving a hose attached defeats the design — water can’t drain back through the long stem.
- If you have an interior shutoff for the outdoor line, close it in fall, then open the exterior faucet to drain residual water and leave it open all winter.
- Insulating faucet covers (foam domes that strap over the spigot) add a useful margin of safety for under $5.
- Test every spring before you load your hose — a 30-second pressurization check will reveal cracks before they flood anything.
For more on tightening fixtures that have loosened over a season, our guide to tightening a loose Kohler faucet handle walks through the same packing-nut and set-screw principles that apply to outdoor bibbs — the mechanical logic is nearly identical.
Choosing the Right Replacement: What Pros Actually Look For
If repair has tipped over into replacement, here’s what separates a $15 home-center bibb from one that will outlast your siding.
Body Material
Forged brass with a minimum 57% copper content resists dezincification — the slow corrosion that turns cheap zinc-alloy bibbs into crumbling, pink-tinged paperweights after 5 – 7 years. Every Adeaga outdoor faucet is forged from C36000 lead-free brass and independently certified to NSF/ANSI 372 for drinking-water safety.
Stem and Seat Design
Compression stems (the classic washer-on-screw design) are easy to rebuild but wear faster. Ceramic-disc and quarter-turn ball-valve stems last 3 – 5 times longer and don’t require periodic washer changes. For high-traffic spigots — RV fillups, pressure-washing, livestock troughs — the upcharge is paid back in the first year.
Anti-Siphon and Backflow Protection
Look for “ASSE 1011” stamped on the body. That’s the U.S. consensus standard for hose-connection vacuum breakers, and it’s required by most municipal plumbing codes. Don’t trust unmarked imports — we’ve cut open enough of them to know the “vacuum breaker” is sometimes just a decorative cap.
Handle Style
Wheel handles give you fine flow control; lever handles are easier with wet or gloved hands; T-handles are vandal-resistant for commercial use. Match it to who’s actually going to use the spigot.
About the Author & Adeaga’s Testing Standards
This guide was written by the Adeaga technical content team and reviewed by our lead product engineer, who has 18 years of experience in residential and light-commercial plumbing fixture design and is a voting member on two ASME plumbing-fixture working groups. Every claim about repair sequence, torque specs, and material standards in this article reflects current U.S. plumbing code and our own bench-test data.
Adeaga has been designing faucets, shower systems, and tub fillers since 2009. Our outdoor hose bibbs and frost-free sillcocks are pressure-cycle tested to 500,000 open-close cycles — five times the IAPMO Z124 industry minimum — and are backed by a limited lifetime warranty on the body and stem. All wetted parts meet NSF/ANSI 61 and 372 lead-free requirements. You can verify our certifications at adeaga.net/certifications, and our customer support team in Columbus, Ohio answers leak-repair questions seven days a week.
Want to dive deeper into how surface finish affects faucet durability? Our research on how material and surface texture influence longevity applies just as much to outdoor brass bibbs as it does to interior fittings — chrome, oil-rubbed bronze, and matte black PVD all behave differently under UV and temperature swings. And for cross-fixture maintenance principles, see our overview of how finish and color choices affect long-term wear.
FAQ
How much does professional garden hose faucet leak repair cost?
A licensed plumber will typically charge $125 – $275 for a standard washer or packing replacement, and $300 – $550 to swap in a new frost-free sillcock, depending on regional labor rates and wall access. The DIY parts cost is usually under $50 even for a full replacement, which is why this is one of the highest-ROI plumbing repairs a homeowner can take on.
Why does my outdoor faucet only leak when the hose is attached?
That’s almost always a worn hose washer inside the female coupling of the garden hose itself, not a problem with the faucet. Unscrew the hose, pop out the small flat rubber washer with a screwdriver tip, and drop in a new one. If it still leaks, check that the hose threads aren’t cross-threaded or stripped — a damaged coupling can put side-load on the faucet’s anti-siphon and cause weeping there too.
Can I use plumber’s putty or silicone to seal a leaking hose bibb?
No. Sealants on the spout, washer, or vacuum breaker are a temporary patch at best and can contaminate drinking water at worst. The only correct sealant on an outdoor faucet is PTFE tape (or pipe-thread compound rated for potable water) on the male threads where the bibb screws into the wall supply. Everything else is solved with the right replacement washer, O-ring, or cartridge.
How do I know if my outdoor spigot is frost-free?
A frost-free sillcock has a long stem — typically 6, 8, 10, or 12 inches — that extends through your exterior wall so the actual shutoff valve sits inside the heated portion of your home. The giveaway from outside is that the body of the bibb is noticeably longer (around 4 inches of brass projecting from the wall) compared to a standard hose bibb’s stubby 1.5-inch profile. If yours is stubby, it’s not frost-free, and a single forgotten hose in November can split the line.
How long should a new garden hose faucet last?
A quality forged-brass frost-free sillcock installed correctly should give you 20 – 30 years of service. The wear parts inside — washer, O-ring, packing — may need replacing every 5 – 10 years depending on water hardness and use, but those are sub-$5 swaps that take 10 minutes. The body itself, if it’s lead-free brass and protected from direct freezing, will typically outlast the siding it’s mounted to.
Is it normal for a new hose bibb to drip slightly when I first turn it off?
A few drops of residual water after closing the valve is normal — that’s water draining out of the spout itself, especially on frost-free models where the entire 8 – 12 inch stem holds water. The drip should stop within 10 – 20 seconds. If it continues past a minute or comes back consistently, the washer or seat is the problem, not residual drainage.